Ambient Temperature Monitor
This project will allow you to read temperature from a digital sensor, display it on the OLED Expansion, and also push the data to Ubidots IoT Platform for logging and monitoring!
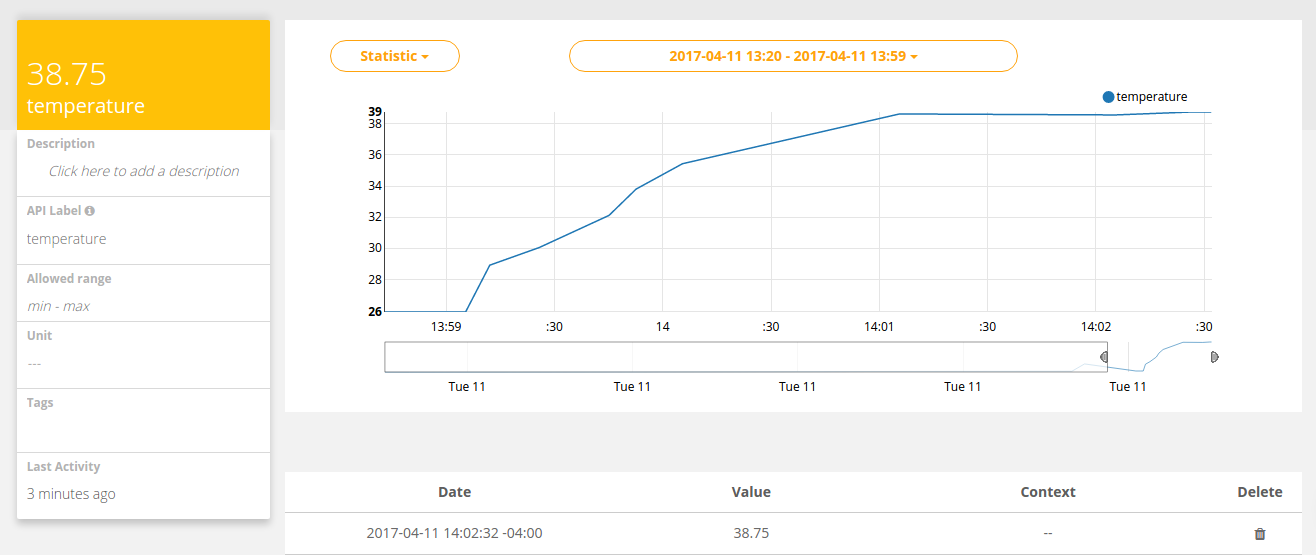
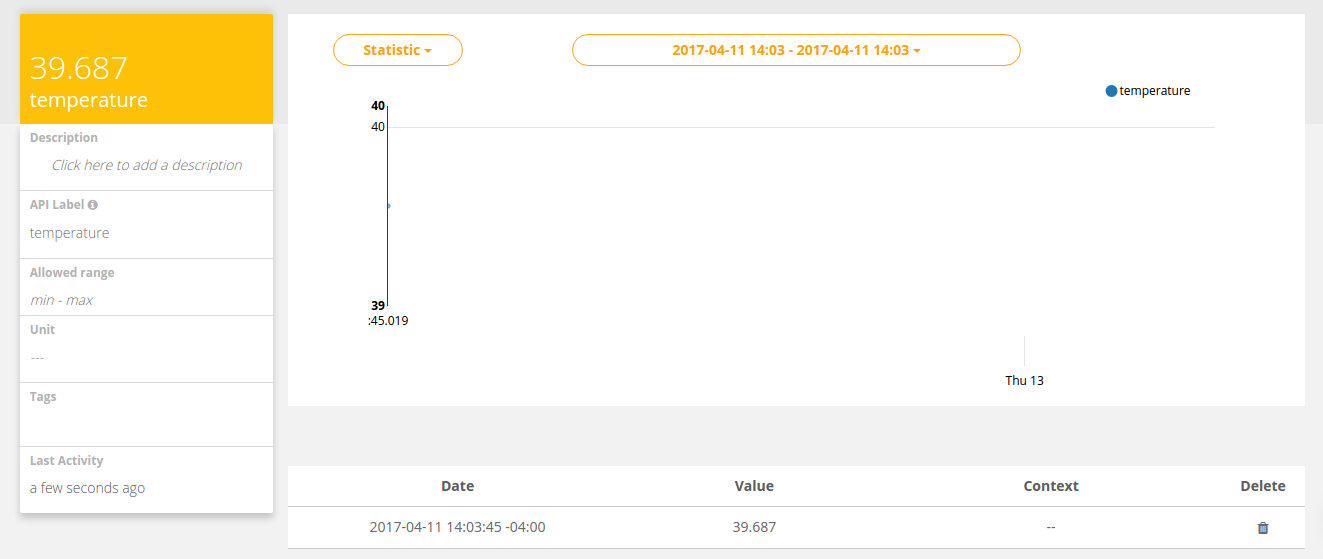
Visualize and track the data on Ubidots:
Overview
Skill Level: Beginner-Intermediate
Time Required: 20 minutes
We’ll be using a software 1-Wire bus to read the temperature from a sensor. The code will then write the value on the OLED Expansion and push the data to your Ubidots account. We’re also using Onion’s pyOledExp module to provide control of the OLED Expansion.
This project also shows how, with a little bit of craftiness, it’s possible to use the Omega’s GPIOs to control external circuits while still using the OLED Expansion.
The complete project code can be found in Onion’s temperature-monitor repo on GitHub.
Ingredients
- Onion Omega2 or Omega2+
- Any Onion Dock that supports Expansions: Expansion Dock, Power Dock, Arduino Dock 2
- Onion OLED Expansion
- 1x DS18B20 1-Wire Temperature Sensor
- 1x 5.1 kΩ Resistor
- We used 5.1 kΩ but anything between 4 and 6 kΩ will work just as well
- 3x Male-to-Female or Male-to-Male Jumper Wires
- Make sure they use threaded wire on the inside
- 1x Breadboard
Tools:
Step-by-Step
Follow these instructions to setup the Ambient Temperature Monitor project on your very own Omega!
1. Prepare
You’ll have to have an Omega2 ready to go, complete the First Time Setup Guide to connect your Omega to WiFi and update to the latest firmware.
Do not plug in your OLED Expansion just yet.
2. Install Software
Connect to the Omega’s Command line and install Python as well as some of the packages we need:
opkg update
opkg install python-light python-urllib3 pyOledExp ubidots-client git git-http ca-bundle
The python-urllib3 package will allow us to make HTTP requests in Python, while the pyOledExp package gives us control of the OLED Expansion.
The ubidots-client package will allow us to push and pull data from the Ubidots IoT Platform.
The git, git-http, and ca-bundle packages will allow us to download the project code form GitHub.
3. Download the Project Code
The code for this project is all done and can be found in Onion’s temperature-monitor repo on GitHub. Use git to download the code to your Omega: navigate to the /root directory, and clone the GitHub repo:
cd /root
git clone https://github.com/OnionIoT/temperature-monitor.git
4. Setup Ubidots
First, sign up for a Ubidots account. At the time this was written, you should have 5000 credits in your account available for trial and testing. This is more than enough to get this project running!
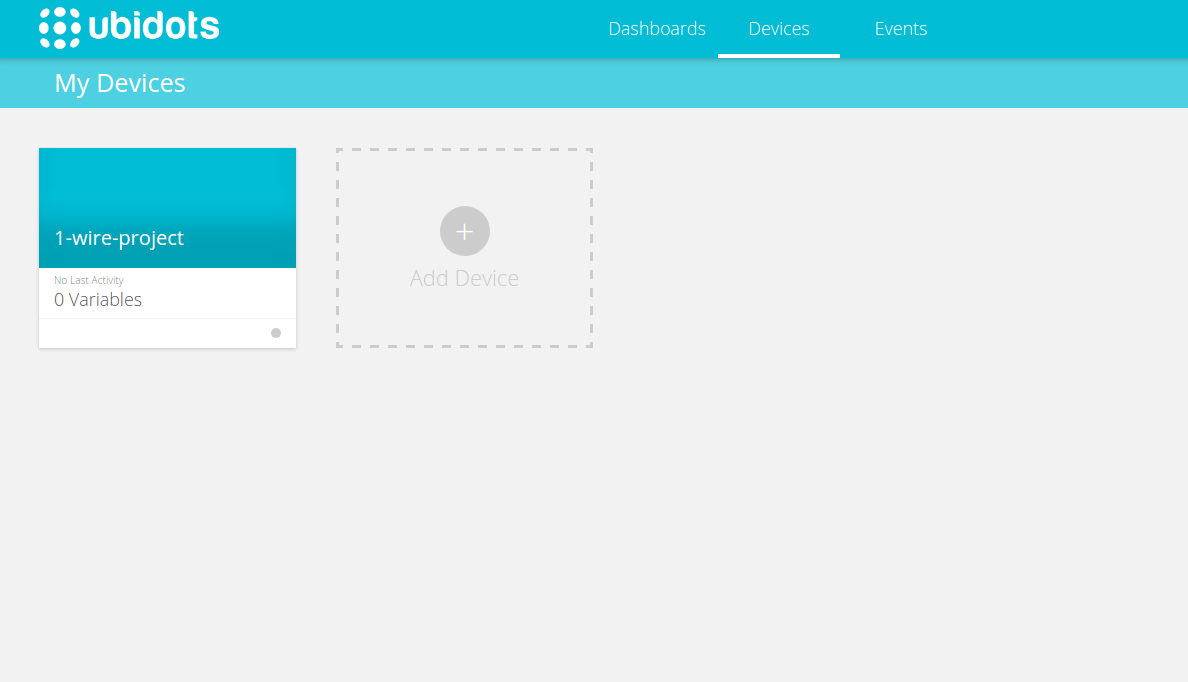
Then go to the account homepage, and click on Devices at the top, and click on the grey Add Device button. Call it 1-wire-project like so:
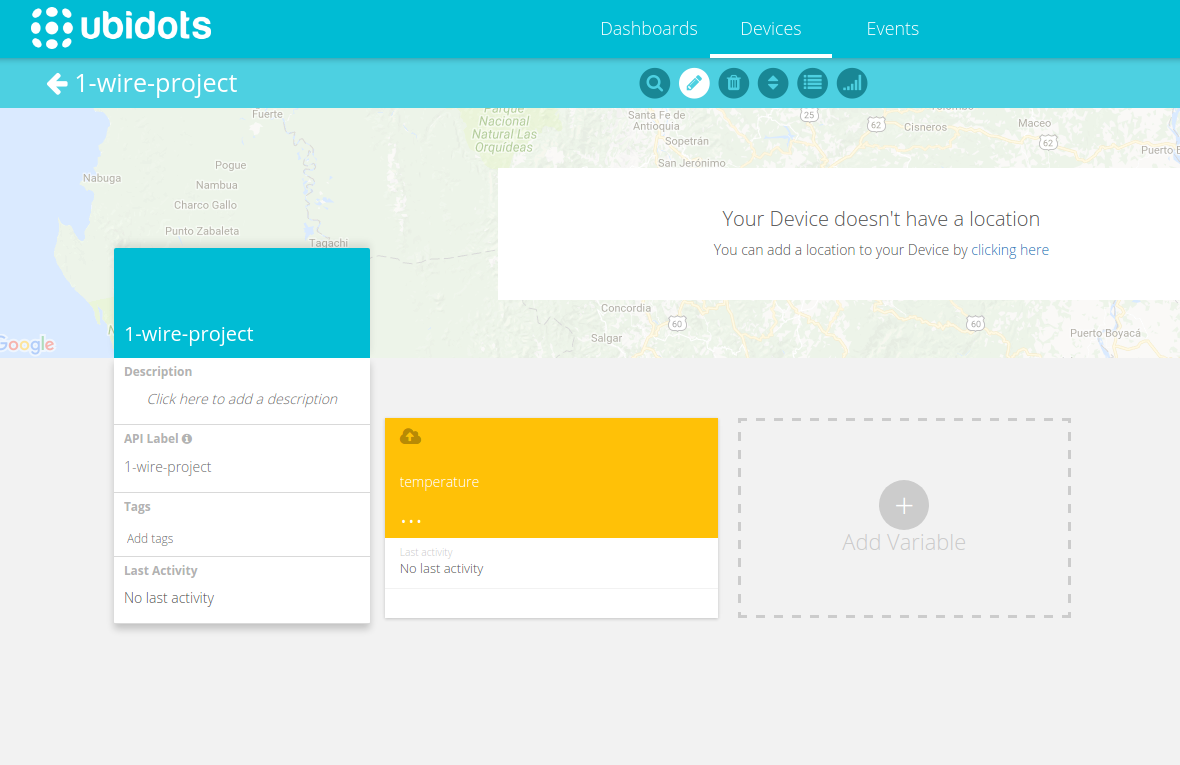
Now we need to add a variable to store our data. Click on the device’s blue card to go to its device page. Then click on the grey Add Variable button, then click Default. Call the new variable temperature (case sensitive) like so:
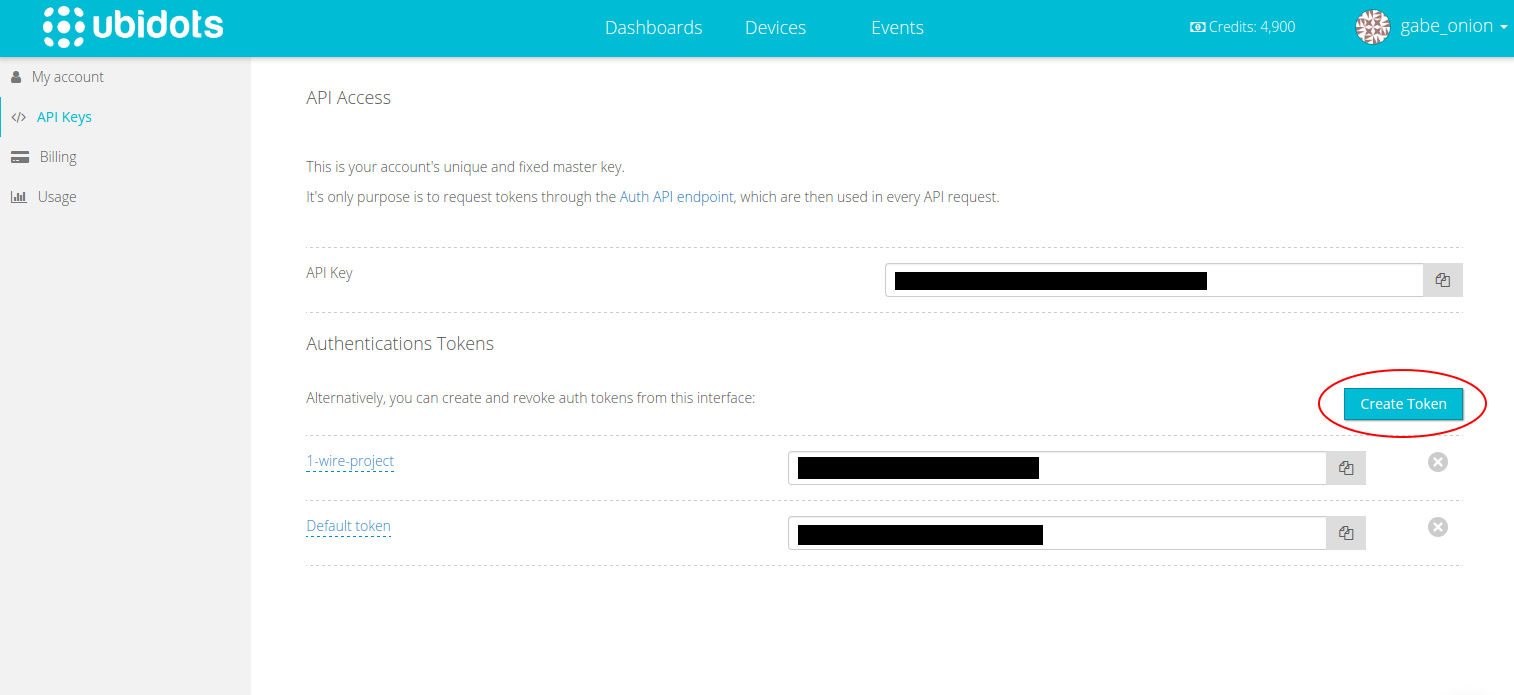
Now we need to create an API key for this project. Click on your username in the top right of the screen, then click My Profile. In the profile menu, click on API Keys on the left. Then click on the blue Create Token button to generate a token; click on the newToken text to rename it to 1-wire-project.
In order to authenticate your requests to Ubidots, you will need to put this long string of text into the config.json file in the project directory on the Omega. Replace the yourTokenhere placeholder with the key you just created:

Your software is now ready to run!
5. Prepare the Wires
Next you will need to prepare the wires. The OLED Expansion does not have female headers to connect wires or Expansions because they may block the screen. To deal with this, do the following for each of the 3 wires:
- Using the wire cutter, cut one connector of the jumper wire off while leaving a male end intact.
- One male end is needed to connect to the breadboard!
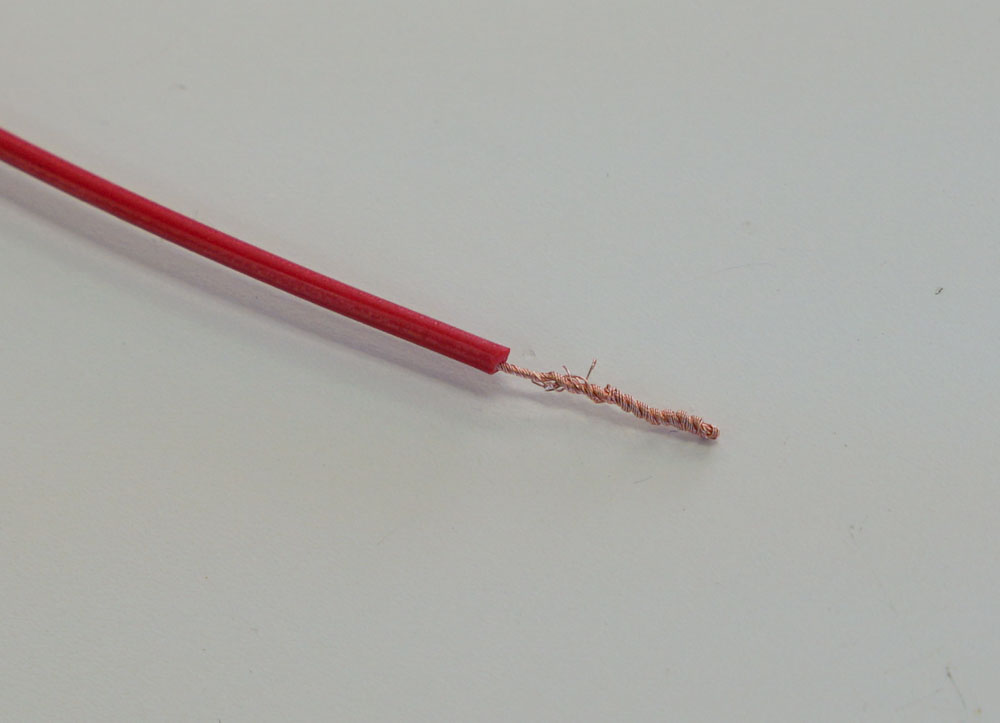
- Using the wire stripper, strip about 10mm of insulation from the freshly cut end.
- Pinch the exposed wire with one hand and twist it several times until the threads are thoroughly wound around each other.
- This is so they don’t fray.
- Take the twisted wire and bend it 180 degrees backwards in half to make a thin hook-like shape.
- Twist the hook again so it closes and doesn’t fray.
Your wires should look like this:
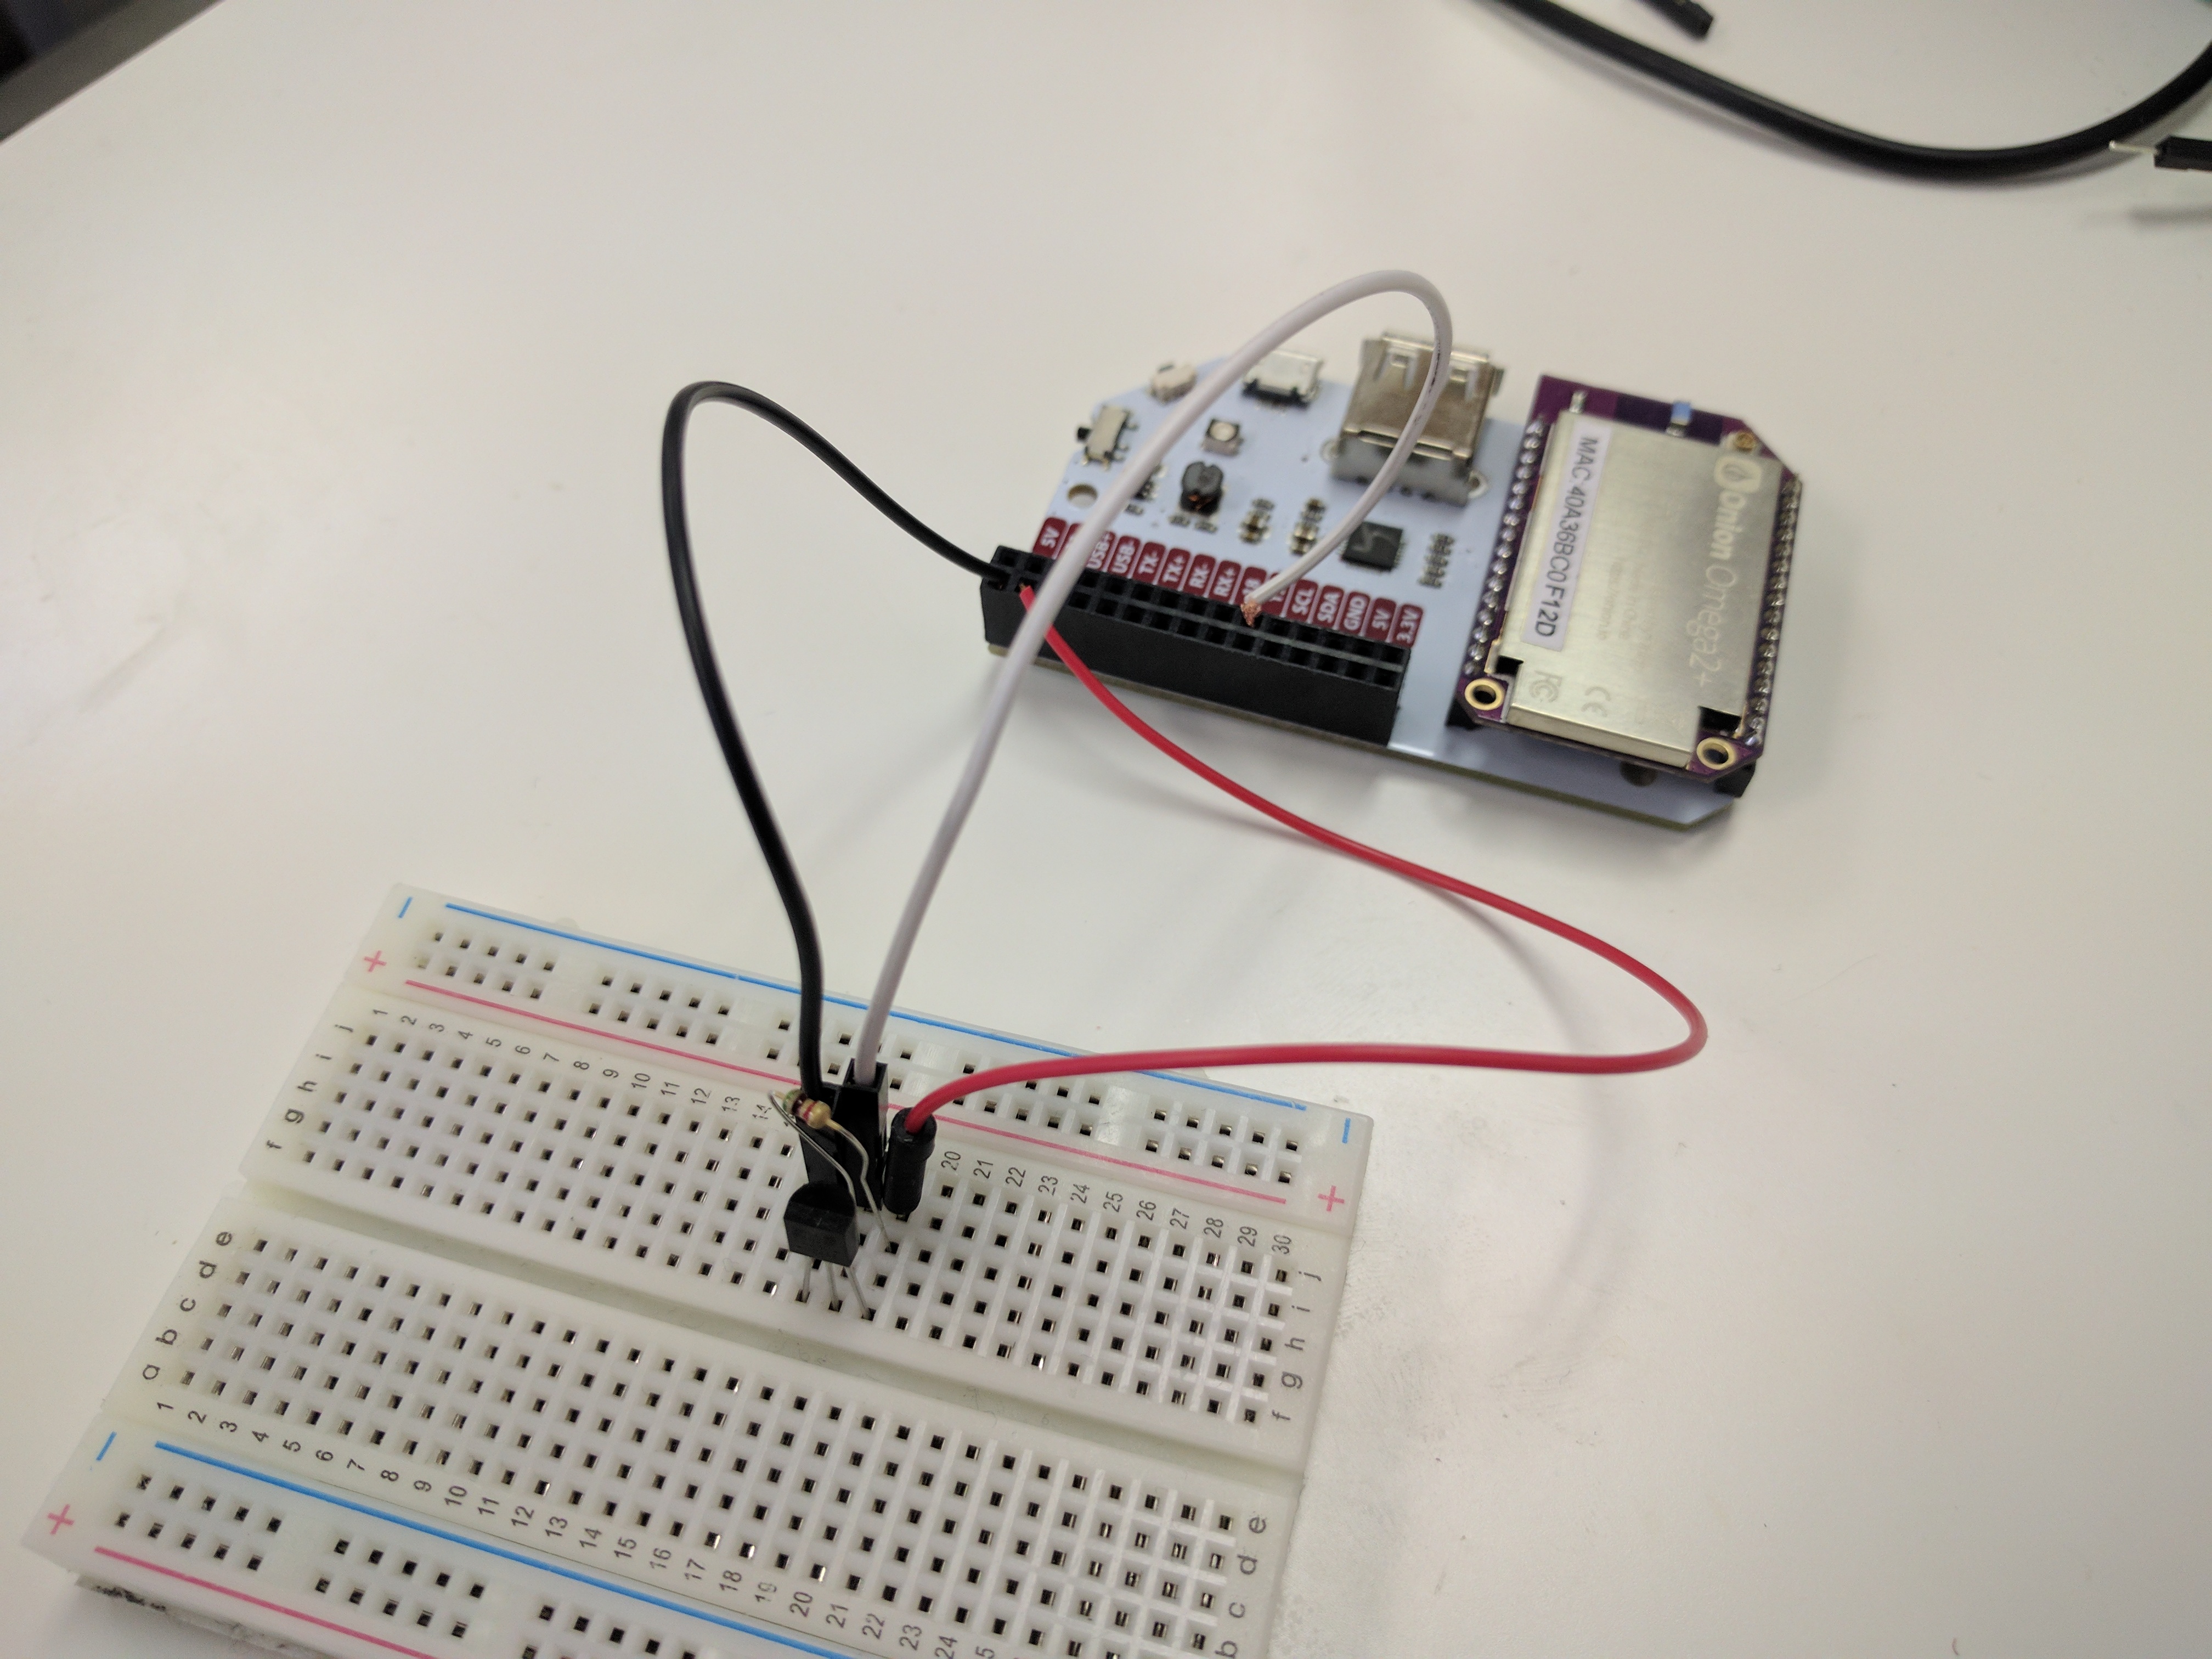
6. Connect the Sensor
Use this diagram for reference when wiring up the sensor:
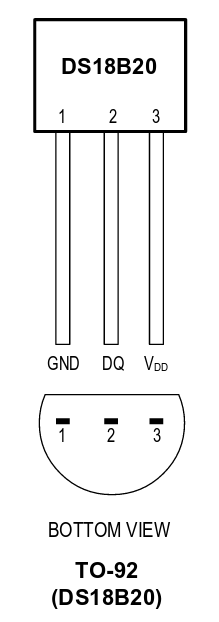
We will treat the flat side as the front.
- With the front of the sensor facing the middle gap of the breadboard, insert the three pins across 3 adjacent rows.
- Connect the 5.1kΩ resistor to both DQ (pin 2) and Vdd (pin 3).
Your sensor should look like this:
7. Sensor -> Omega
Our sensor is now ready and we need to connect it to the Omega using the wires we just prepared. The male end of the wire will plug into the breadboard while the bare ends will go into the Dock’s Expansion pins.
- Connect GND (pin 1) to the Omega’s GND pin.
- Connect DQ (pin 2) to the Omega’s GPIO19.
- Connect Vdd (pin 3) to the Omega’s 3.3V pin.
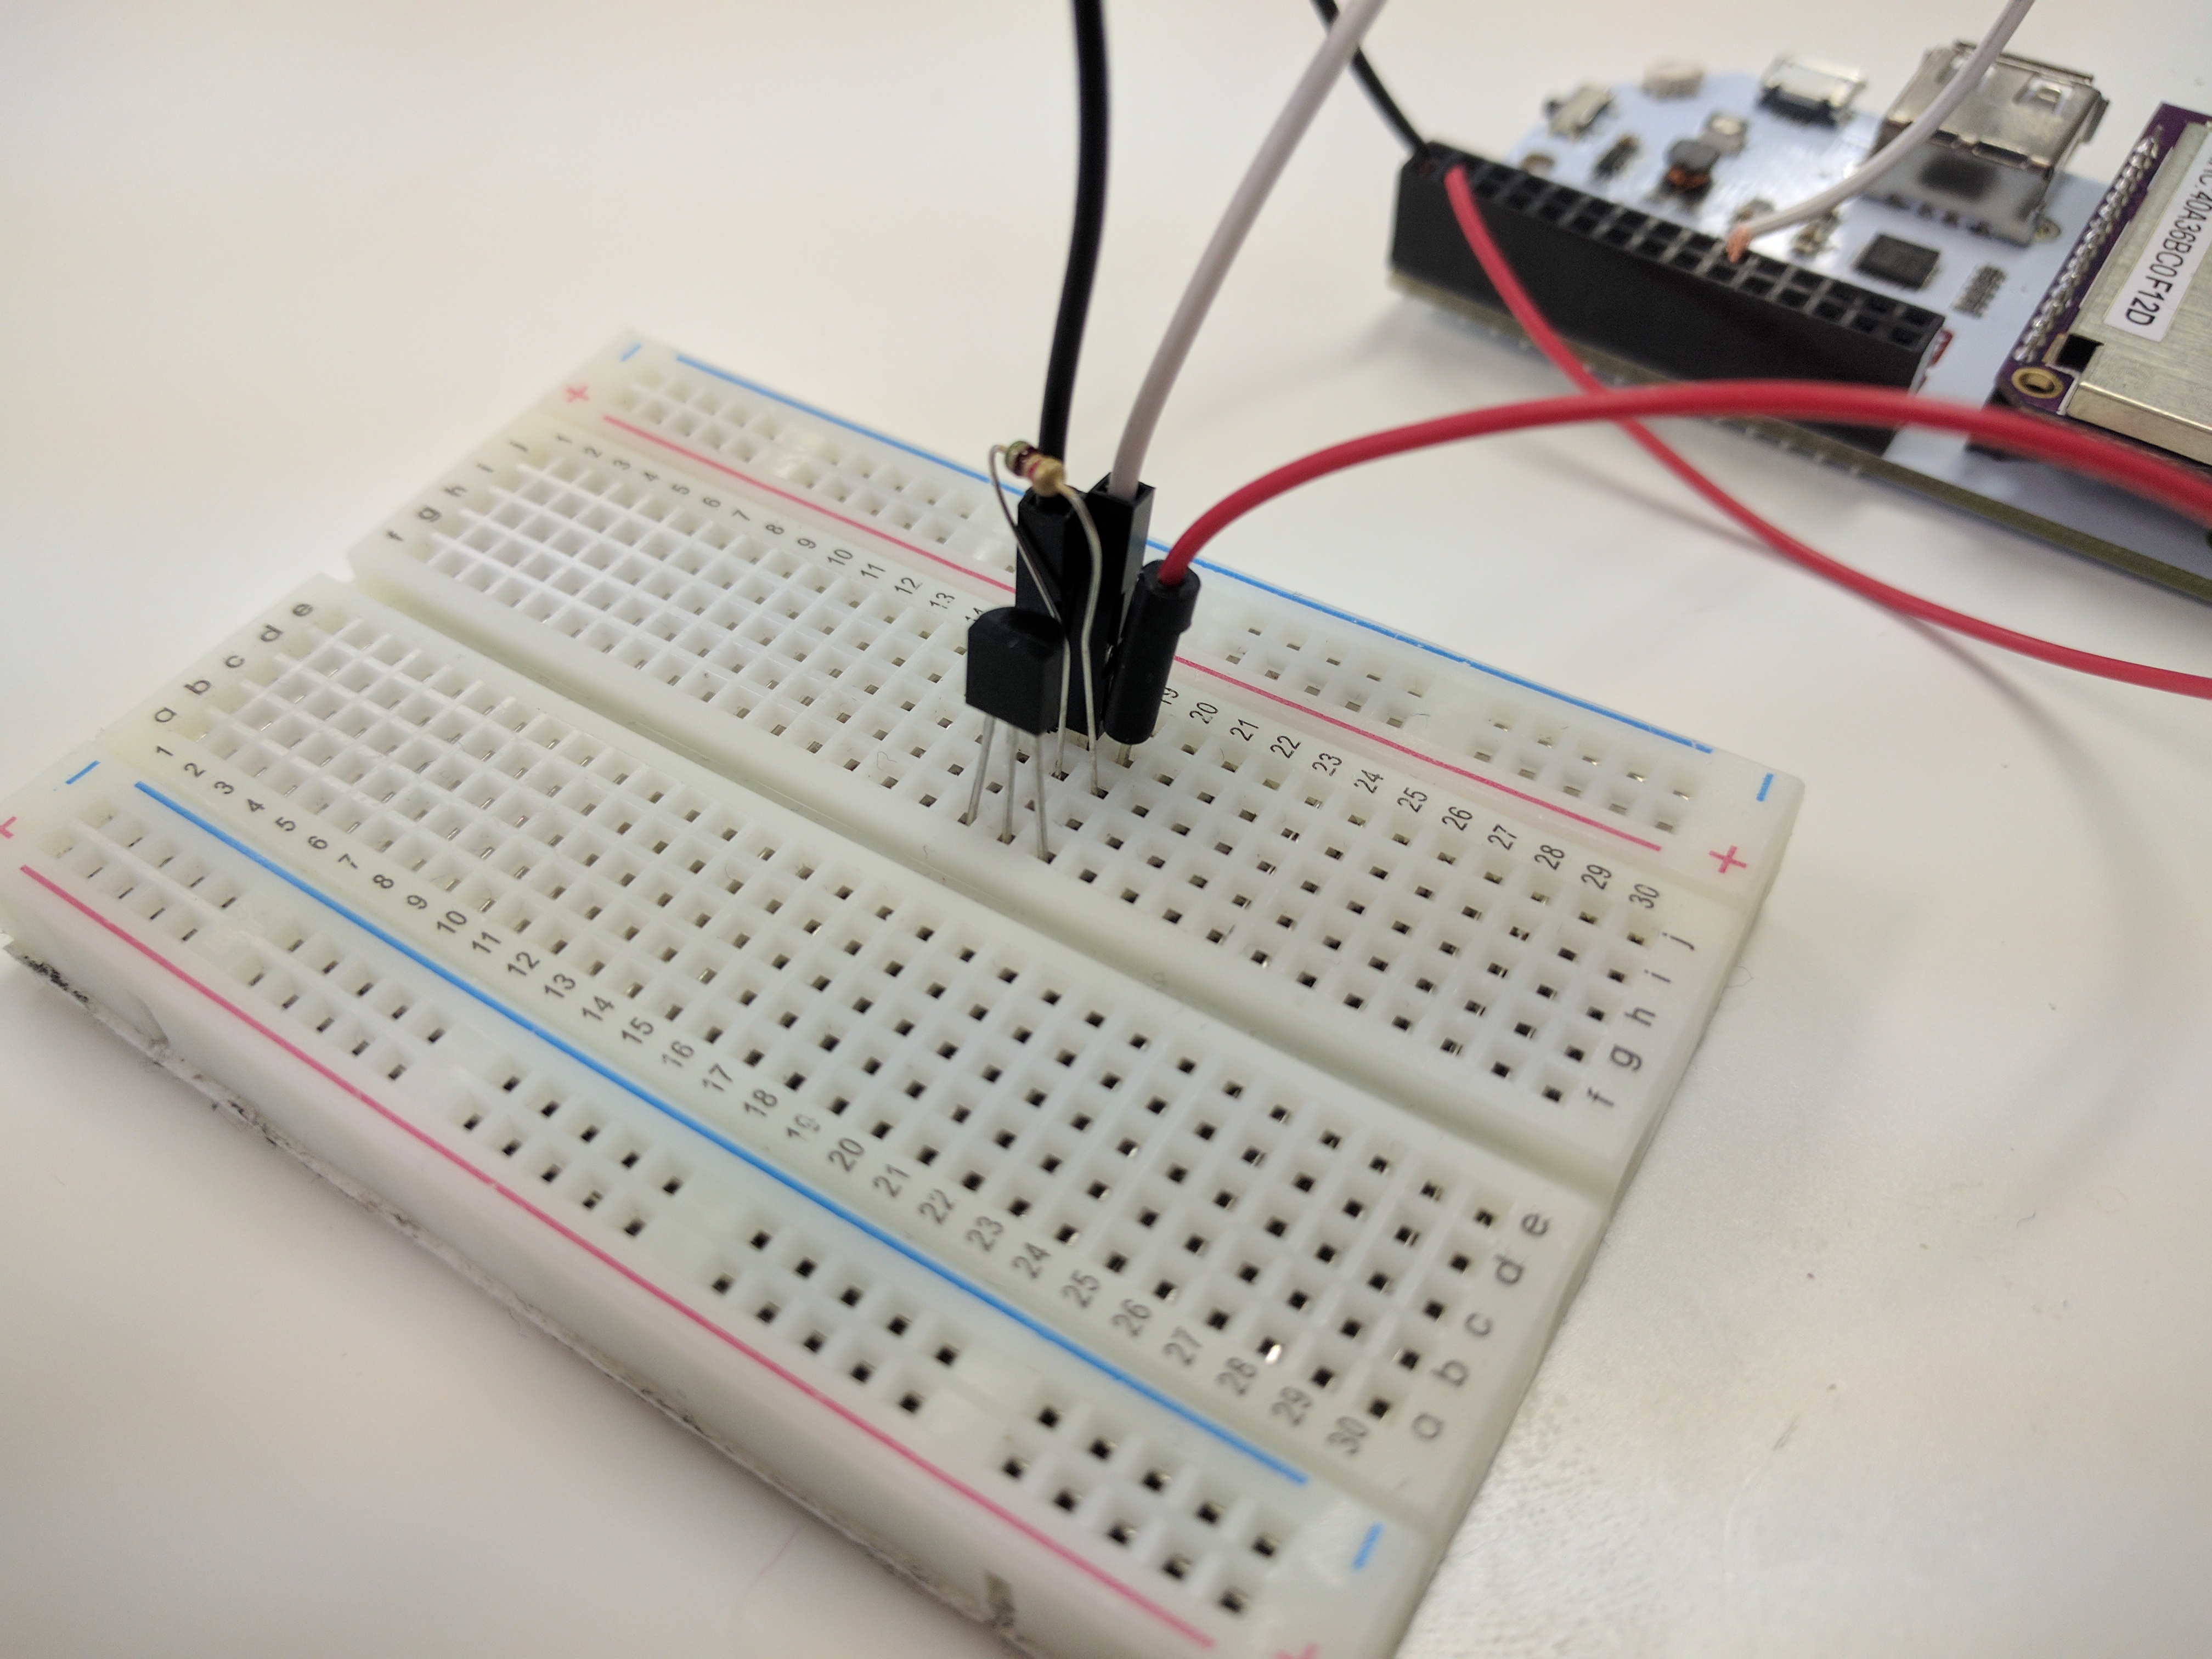
Insert the bare ends of the wire into the Expansion Dock like this:
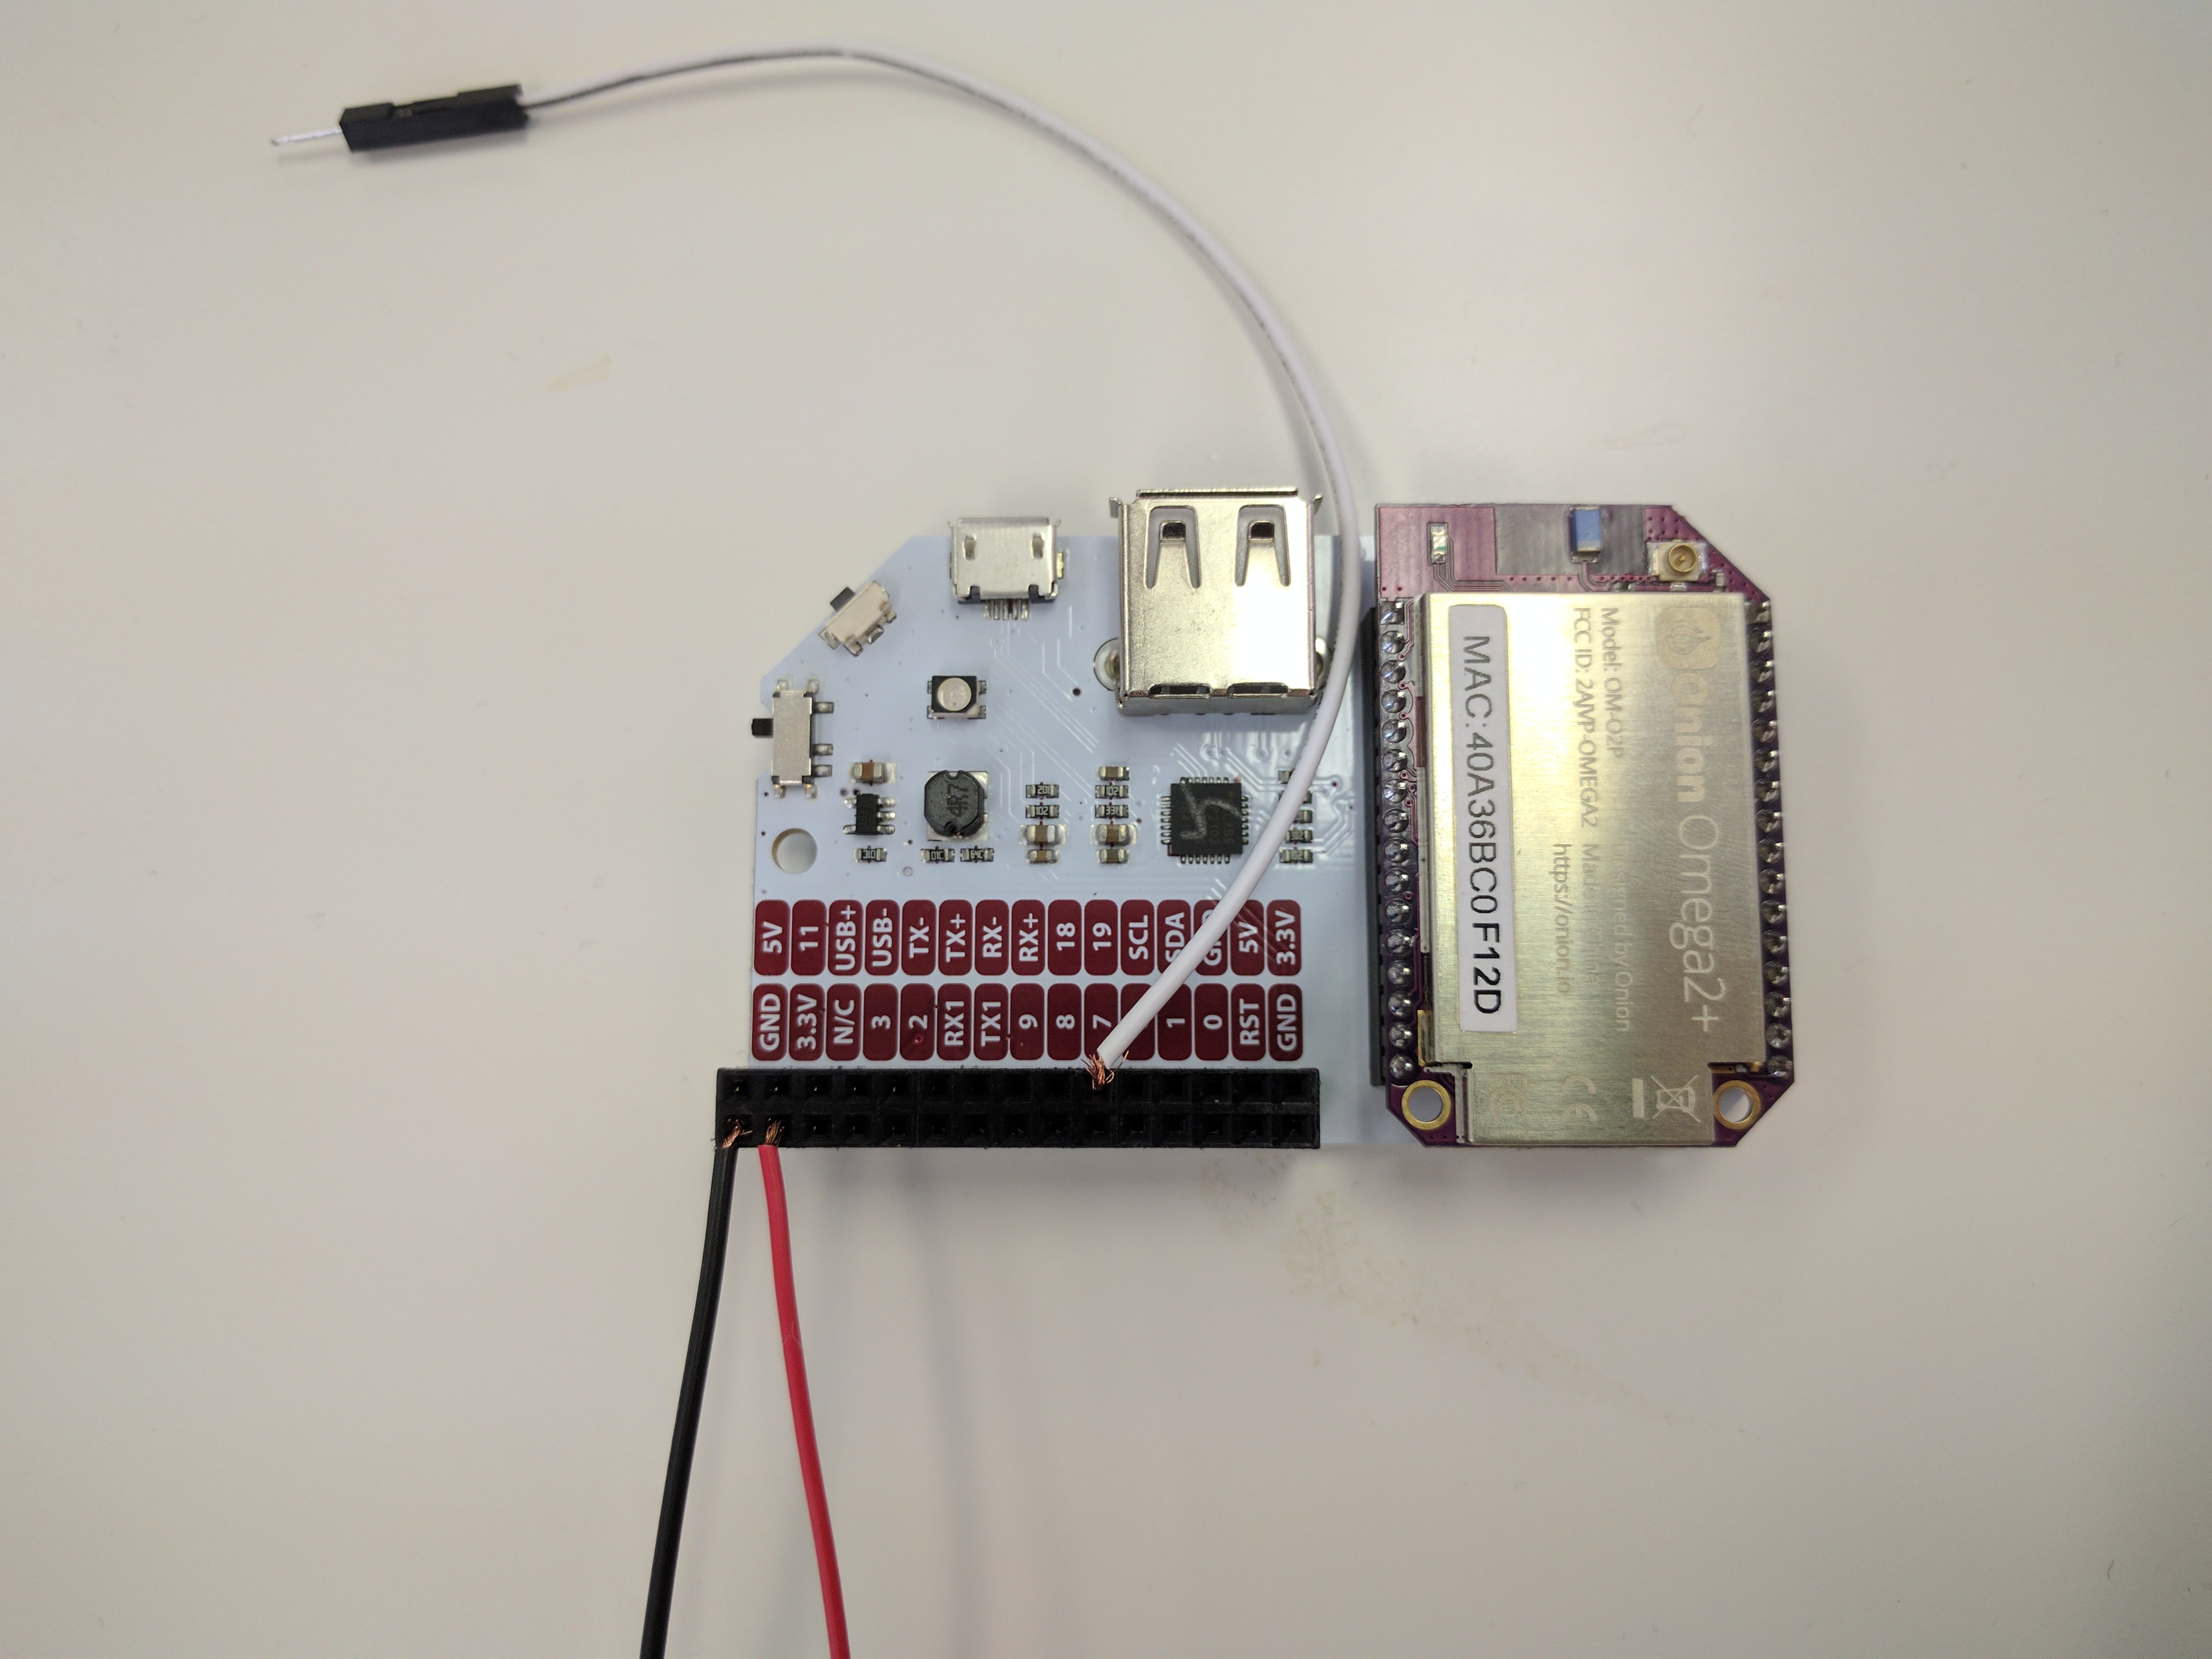
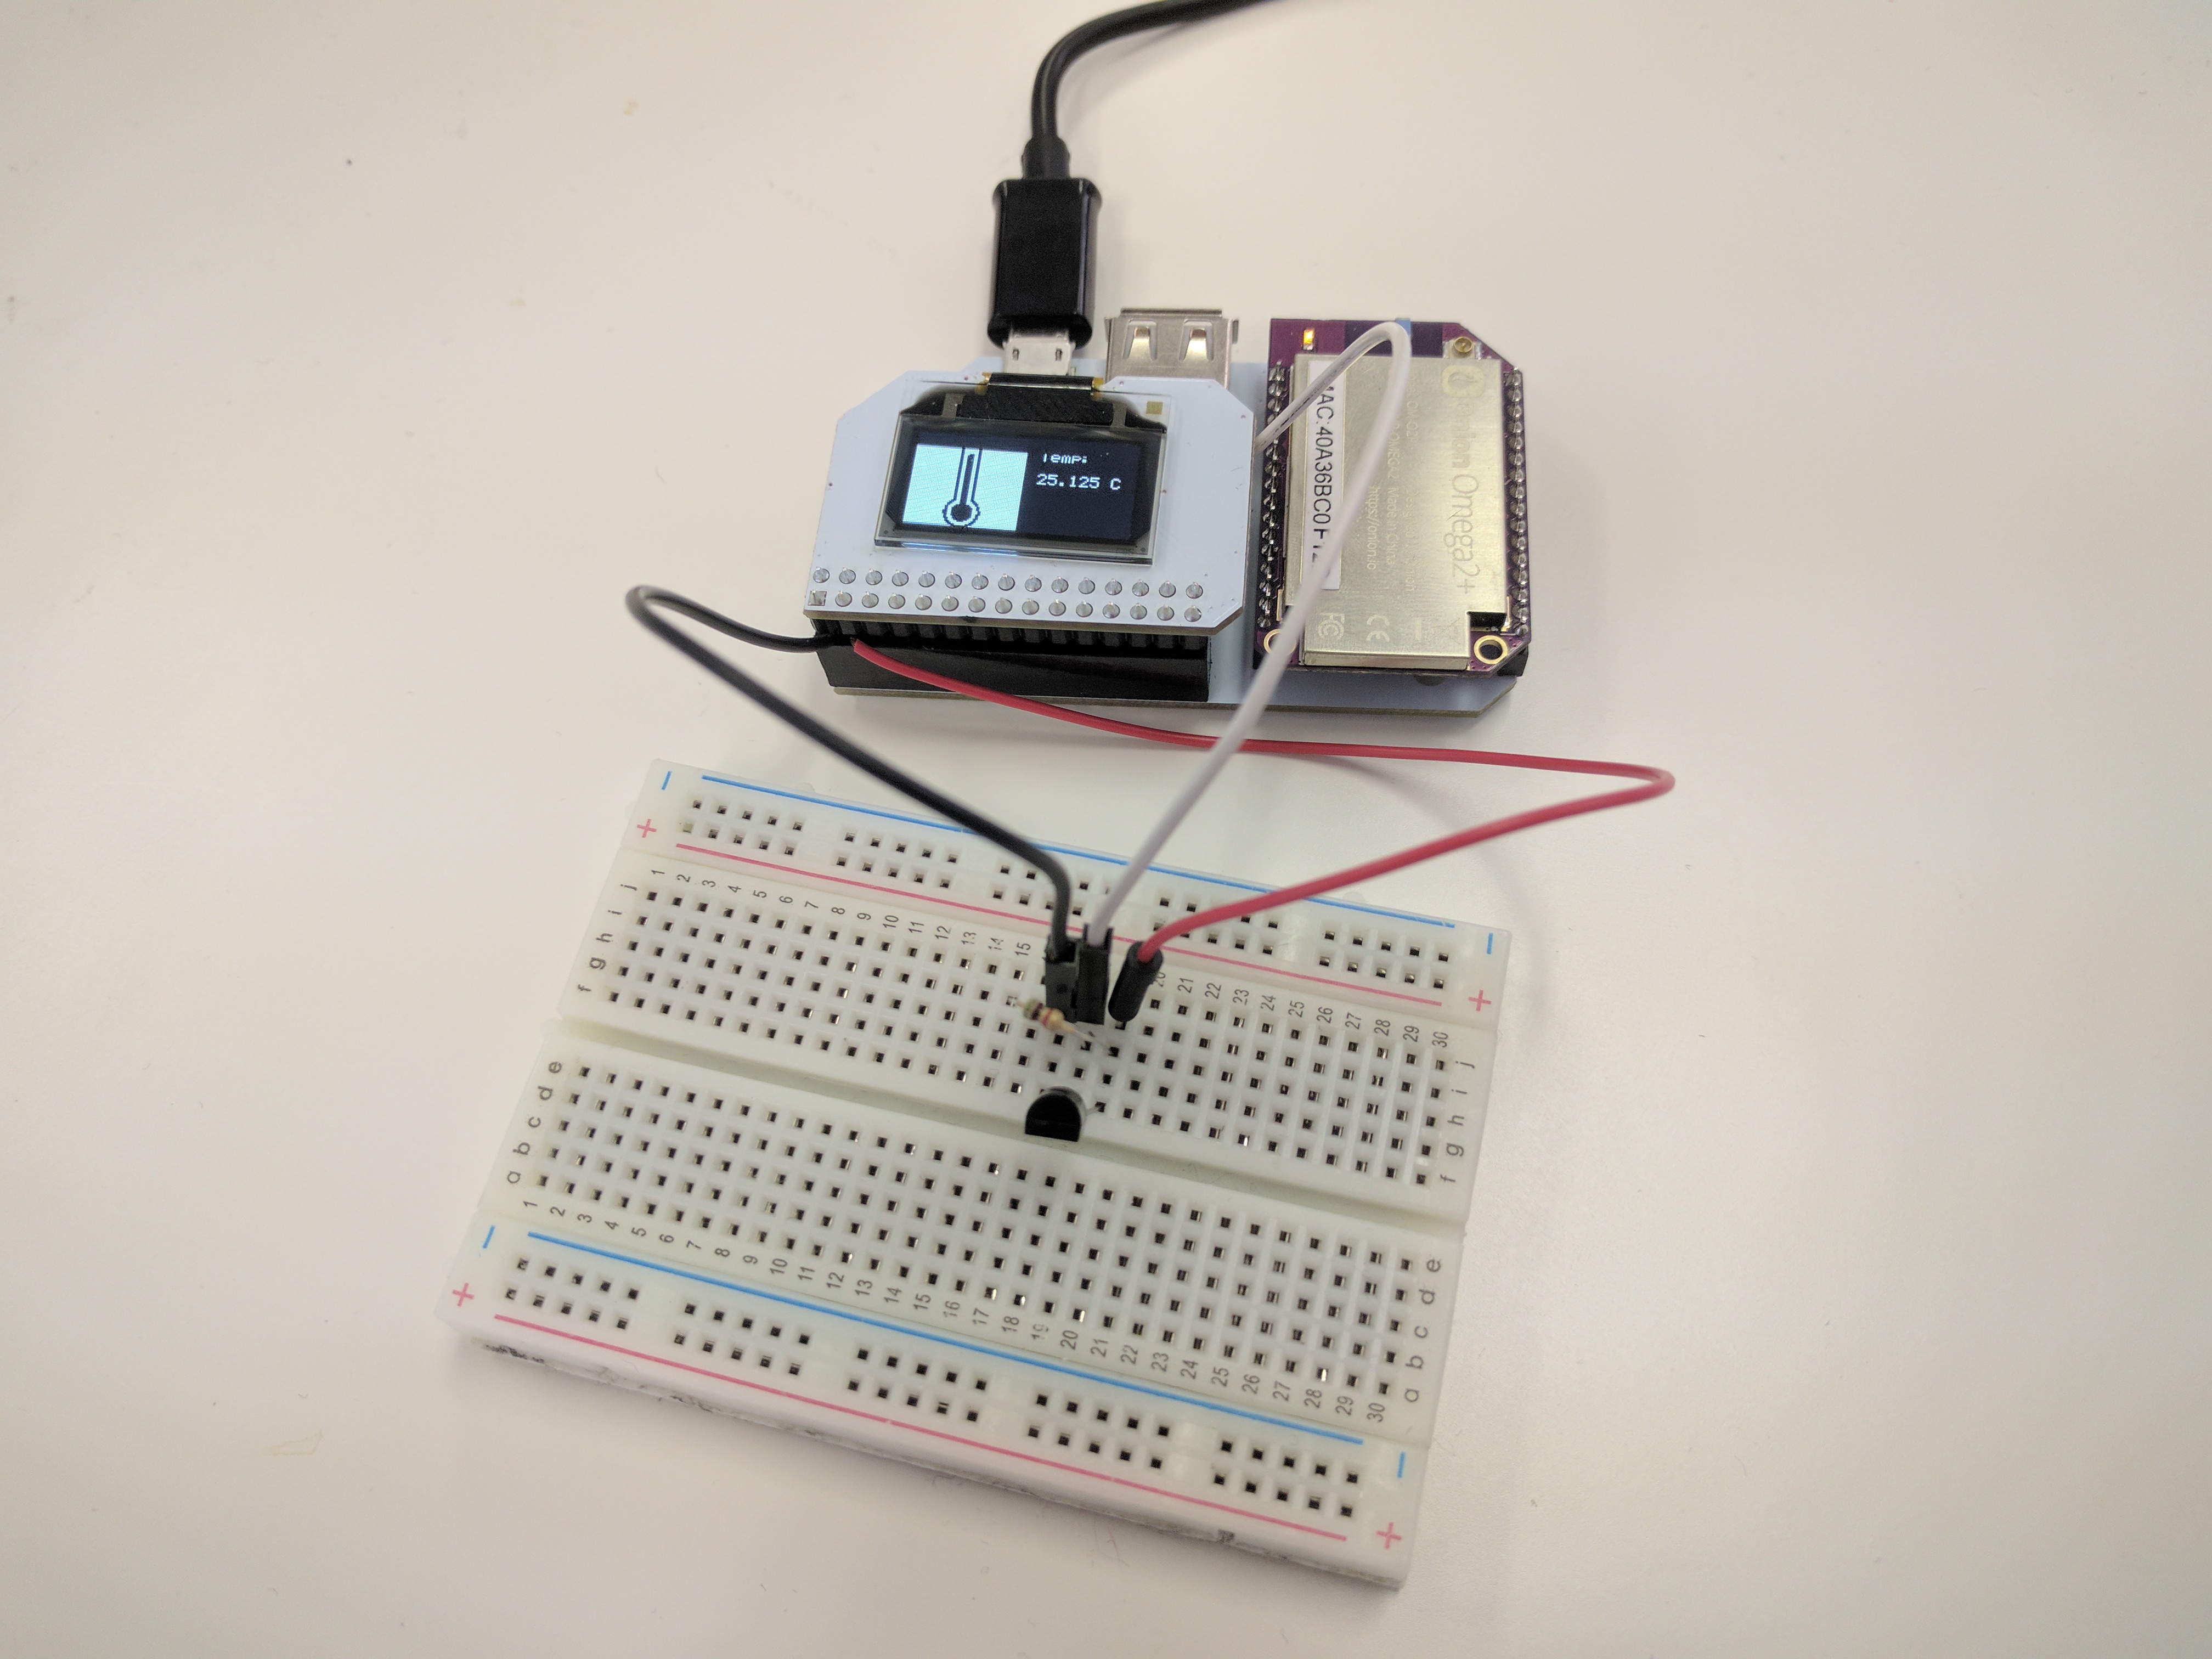
Your circuit should now look like this so far:
8. Connect OLED Expansion
The OLED Expansion will then plug in on top of the wires; it might be a little bit of a tight squeeze but you will definitely be able to successfully plug in the Expansion. Plug it in and it should look like this:
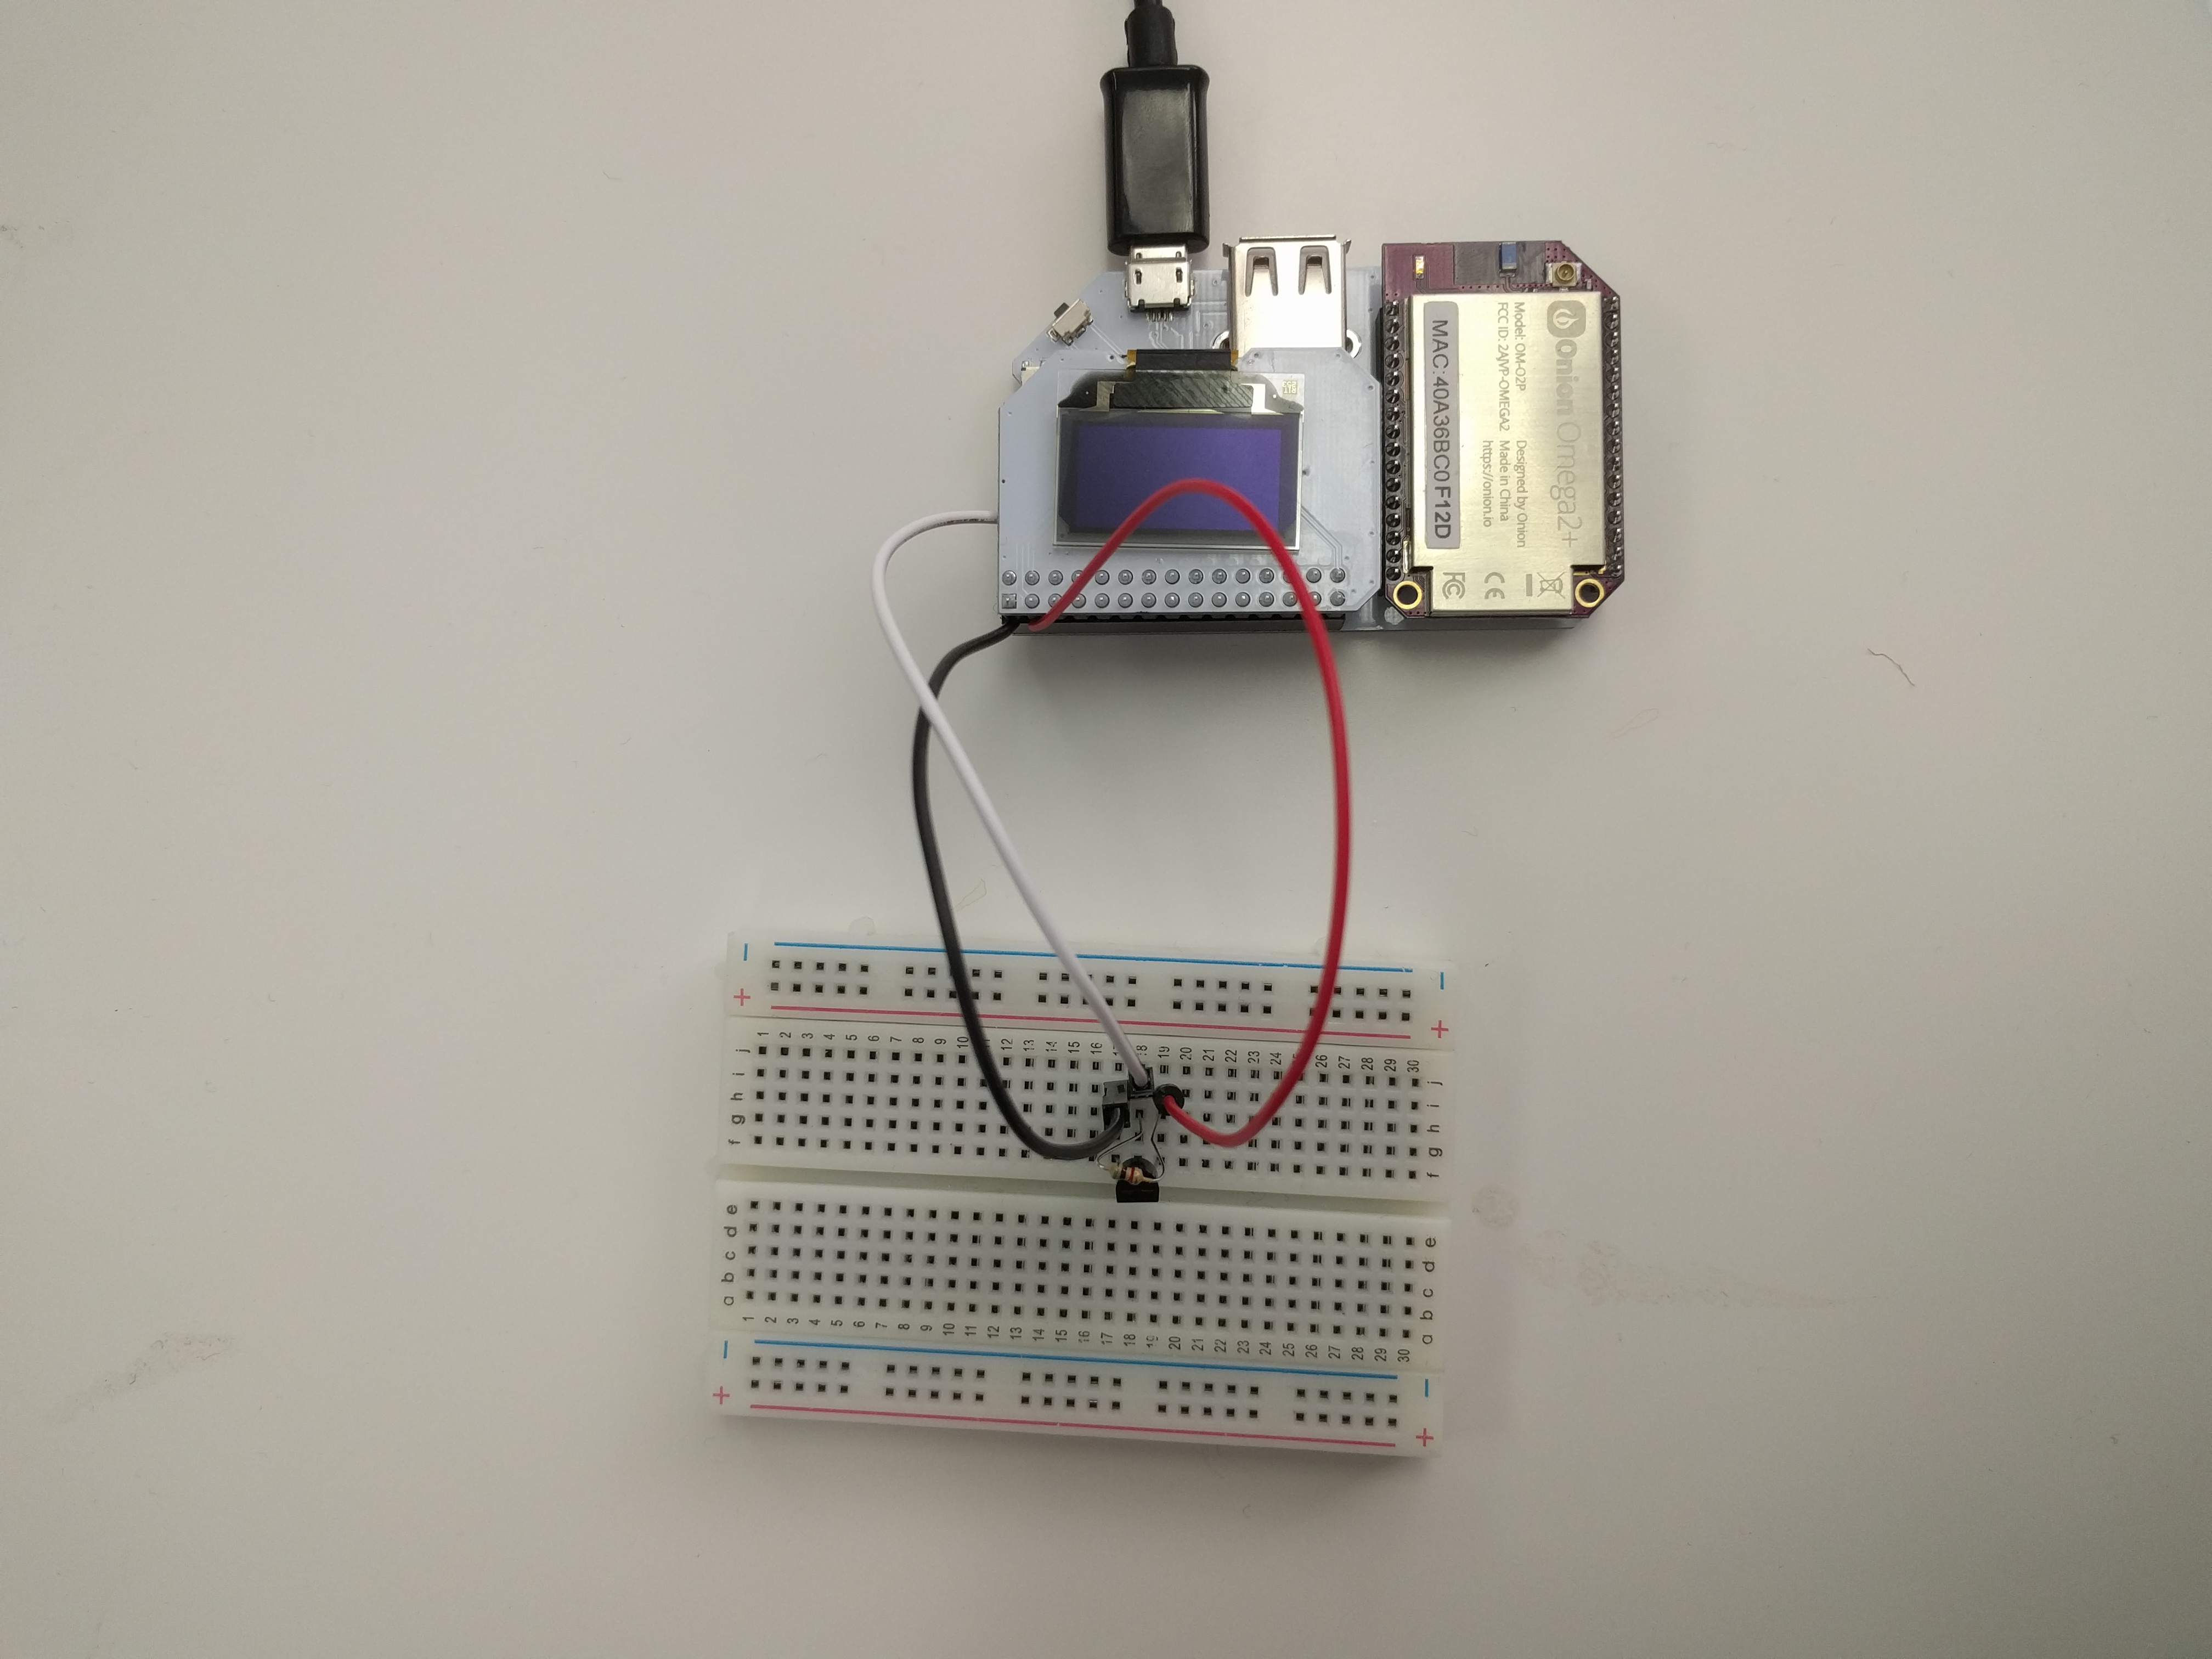
Good work! You’ve just done a little bit of physical hacking to use a sensor alongside the OLED Expansion.
9. Run the Code
On the Omega, launch the program:
cd /root/temperature-monitor
python main.py
You should see something like this:
Now go to your Ubidots account page and check on your temperature variable in the 1-wire-project device. You should see your new reading:
10. Automate the Program to Run Periodically
The program will read the temperature, display it on the OLED, push the value to Ubidots, then promptly exit. We’ll use cron, a super useful Linux utility, to have the program run periodically.
Enter crontab -e to add a task to the cron daemon, it will open a file in vi, enter in the following:
* * * * * python /root/temperature-monitor/main.py
#
This assumes that your project code is located in
/root/temperature-monitor
Now, we’ll restart cron:
/etc/init.d/cron restartAnd the code will run once every minute, pushing data to your Ubidots account so that you can view the changes over time!
Check out the Omega documentation for more info on using
cron
Code Highlight
This project makes use of two main interfaces: 1-Wire and Ubidots.
1-Wire
The 1-Wire protocol is a bus-based protocol that, as the name implies, uses one data wire to transmit data between devices. The main.py script uses some functions from the oneWire.py module to automatically do the following:
- setup a 1-Wire bus on the Omega
- scan for the temperature sensor’s address
- use the sensor in subsequent calls without you having to probe it yourself!
Ubidots
The Ubidots requests are handled by the ubidots-client command line utility that the Ubidots class calls. This is the same as running the command below:
ubidots -t (TOKEN) -d (DEVICENAME) set '{"variableOne":12, "variableTwo":10, ...}'In the case of this project, the equivalent command would be:
ubidots -t (TOKEN) -d (DEVICENAME) set '{"temperature": (VALUE READ FROM SENSOR)}'