Expansion Dock
The Expansion dock is a powerful piece of hardware that simplifies the usage of your Omega. It allows you to power the Omega and communicate with it via serial through the Micro-USB port, and makes it incredibly easy to use the GPIOs and Onion Expansions.
The Hardware
Your Expansion Dock has a 30 pin Expansion Header, allowing you to use all of your Onion Expansions. The Expansion Dock is powered by the Micro-USB port that supplies 5V to the Dock. This voltage is stepped down to the required 3.3V required to power the Omega, and also provides 5V to the Expansions and USB Host port.
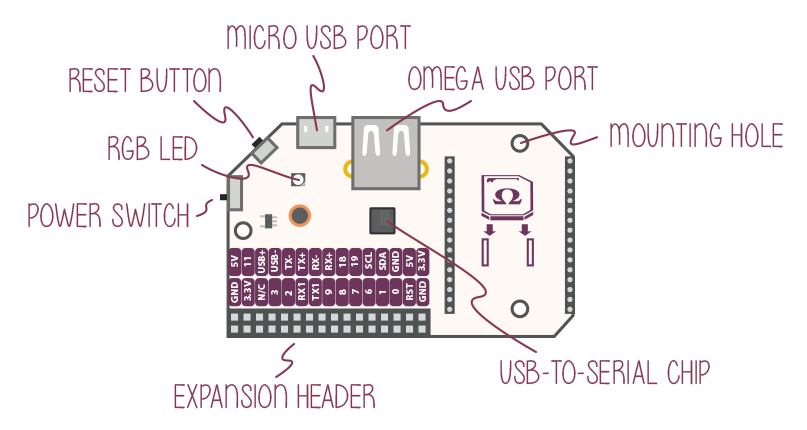
The Expansion Dock allows for easy communication via the USB-to-Serial chip located in the center of the board. You’ve also got a great RGB LED that you can control through the command-line interface.
The reset button, located between the power switch and the Micro USB port, can be used to quickly reboot your Omega, or you can hold it down for a factory reset if your Omega is ever in a bad state.
Connecting an Omega
To connect an Omega to the Expansion Dock, line up the Omega’s edges with that of the Expansion Dock’s as demonstrated below:

Make sure your Omega is pushed all the way down as demonstrated in the picture below:

You may need to line up the pins with the holes before pressing the Omega into the Dock.
The Expansion Header
The Expansion Header is a convenient tool that gives you easy access to the Omega’s GPIOs, and allows you to connect Onion Expansions directly. The Expansion Header is labelled to show you what GPIO is connected to each section.
The pinout diagram below shows the Expansion Header’s connections and the possible multiplexing options:
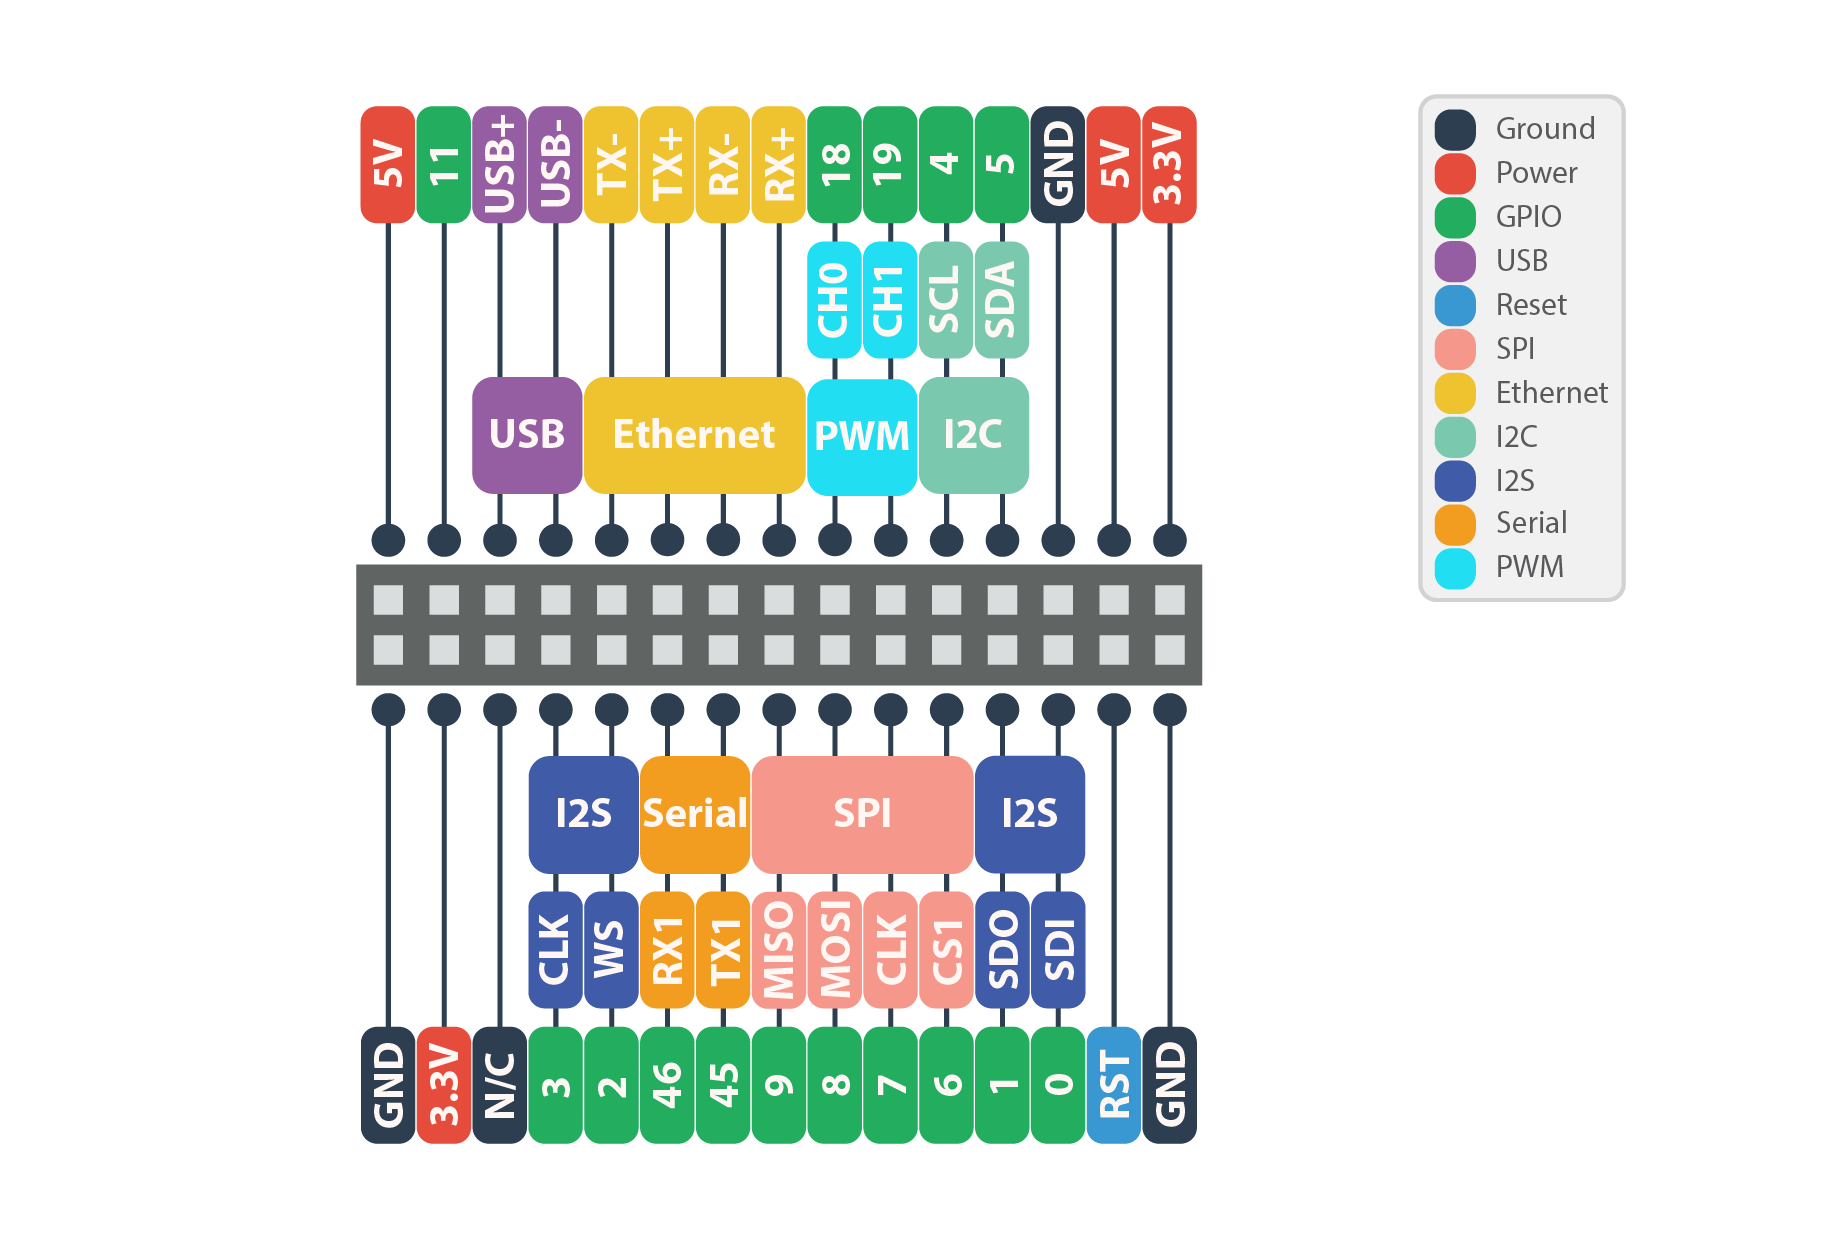
By default, the Serial, SPI, and I2C pins implement these communication protocols and cannot be used as GPIOs. Similarly, the I2S and PWM pins are set to GPIO mode by default.
To learn more on changing the functionality of the Omega’s pins, see the Multiplexing GPIOs section of our article on the Omega’s GPIOs.
The MicroUSB Port
The Micro-USB Port is used to supply power to the Dock, which in turn supplies power to the Omega.
The Micro-USB Port takes in 5V, and the Dock comes equipped with a voltage regulator to step the voltage down to 3.3V required for the Omega.
USB-to-Serial
The USB-to-Serial chip allows for a serial connection between the Omega and a computer using the USB-C port. You can connect a USB-C to USB cord from the Omega to your computer, open a terminal, and connect to the Omega via a COM port as opposed to SSH.
For more information on the Omega’s Serial connection read our guide to connecting to the Omega
Power Switch
The Power switch will cut power to the Omega, but not the serial chip. This means your computer will still detect a USB serial device, but will not be able to communicate with the Omega.
Omega USB Port
The Omega’s USB Port can be used to connect to all sorts of devices, namely a USB storage device to extend the storage space of your Omega. The USB port supports USB 2.0, and is a type A connector.
RGB LED
The RGB LED on the Expansion Dock consists of three LEDs that give you the ability to create RGB colors on the Expansion Dock.
GPIO 17 controls the red LED. GPIO 16 controls the green LED. GPIO 15 controls the blue LED.
The RGB LED is active-low, meaning that setting the GPIO to 0 will turn on the designated LED.
Mechanical Drawings
We’ve made available a detailed diagram of the dimensions and geometry of the Expansion Dock.
Using the Dock
The Expansion Dock makes it incredibly easy to use your Omega. It let’s you easily power your Omega, and use Onion Expansions without any external circuitry required. It also makes sure that you don’t accidentally burn out your Omega by supplying too much power.
Controlling the GPIOs
The GPIOs on the dock can be controlled using a number of tools we’ve included in the Omega firmware. You find more on how you can control the Omega’s GPIOs in the article on using the Omega’s GPIOS
Controlling the RGB LED
You can use the expled tool to specify the color of the RGB LED. It will use software PWM to drive the three LEDs.
Usage:
expled <6 digit hex value>Where the first two digits represent the Red value, the next two represent the Green value, and the last two represent the blue value.
Example:
expled 0xf21133This will set the Red to 0xf2, the Green to 0x11, and the Blue to 0x33.
The LED should now be pink-ish. Try experimenting with other colors!