Onion Omega2 Pro
The Omega2 Pro is the next generation of our Omega2 and the most powerful IoT computer we’ve made yet. It is a standalone device – the processor, memory, gigabytes of storage, and Wi-Fi are all built-in, and it’s smaller than a breadboard.
Getting Started with the Omega2 Pro
See our guide on getting started with the Omega2 Pro for all of the details on getting your device up and running: https://onion.io/omega2-pro-get-started
It also includes an FAQ that will answer any questions that may come up.
Hardware Designs, Measurements, Images, and More
Visit the OnionIoT/Omega2-Pro GitHub repo: https://github.com/OnionIoT/Omega2-Pro
The Omega2 Pro at a Glance
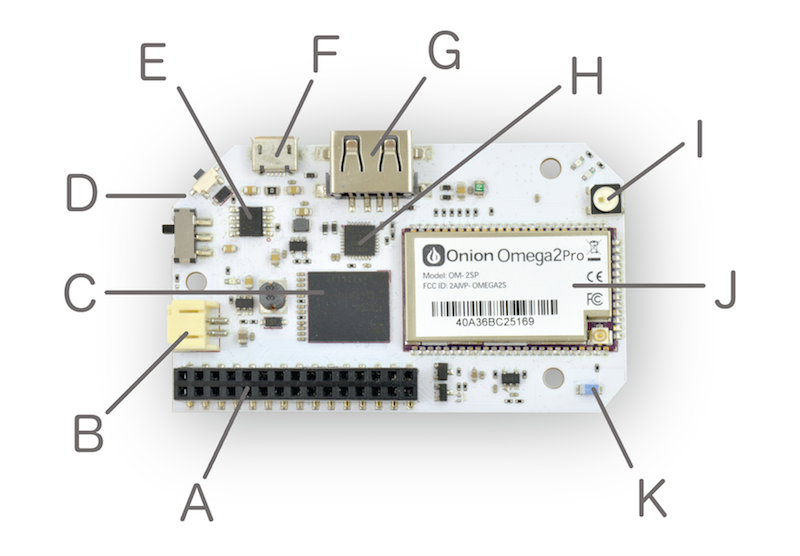
| A. 30-pin expansion header | G. USB host |
| B. Battery connector | H. USB-to-serial |
| C. 8 GB eMMC | I. Full-color LED |
| D. Programmable button | J. Omega2 core |
| E. Power management | K. Chip antenna |
| F. Micro USB (power & serial) |
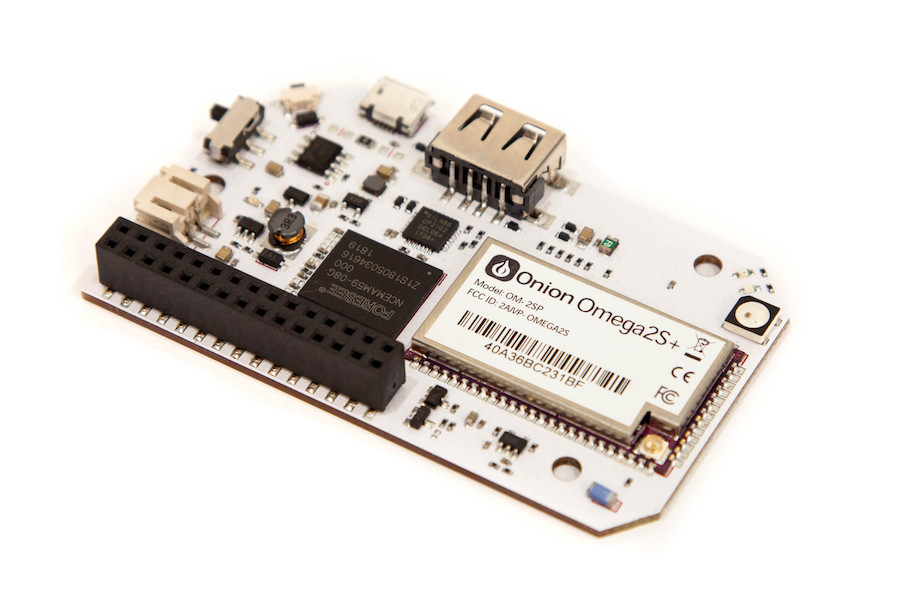
The Omega2 Pro is based around the Omega2S+ module, it is the centerpiece of the Omega2 Pro, providing the CPU, 128MB RAM memory & WiFi radio.
| Omega2 Pro Specs | |
|---|---|
| Processor | 580MHz MIPS CPU |
| Memory | 128MB RAM and 384MB Swap File |
| Storage | 8 GB eMMC Storage |
| Connectivity | 2.4 GHz b/g/n Wi-Fi |
| Operating System | OpenWrt 18.06 Linux |
| Storage | 8 GB eMMC Storage |
| Battery Support | LiPo battery management & JST-PH battery connector |
| Antenna | 2 dBi directional chip antenna & U.FL connector for external antenna |
| Dimensions | 73 mm x 44 mm |
| USB | USB 2.0 |
| GPIOs | 18 |
| PWM | 2 |
| UART | 2 |
| I2C | 1 |
| SPI | 1 |
| I2S | 1 |
The Expansion Header
The Expansion Header is a convenient tool that gives you easy access to the Omega’s GPIOs, and allows you to connect Onion Expansions directly. The Expansion Header is labelled to show you what GPIO is connected to each section.
Take a look at the Using the GPIOs article to learn more about the Omega’s GPIOs, multiplexing GPIO functionality, and the behaviour and requirements of the Omega’s special GPIOs.
The pinout diagram below shows the Expansion Header’s connections and the possible multiplexing options:
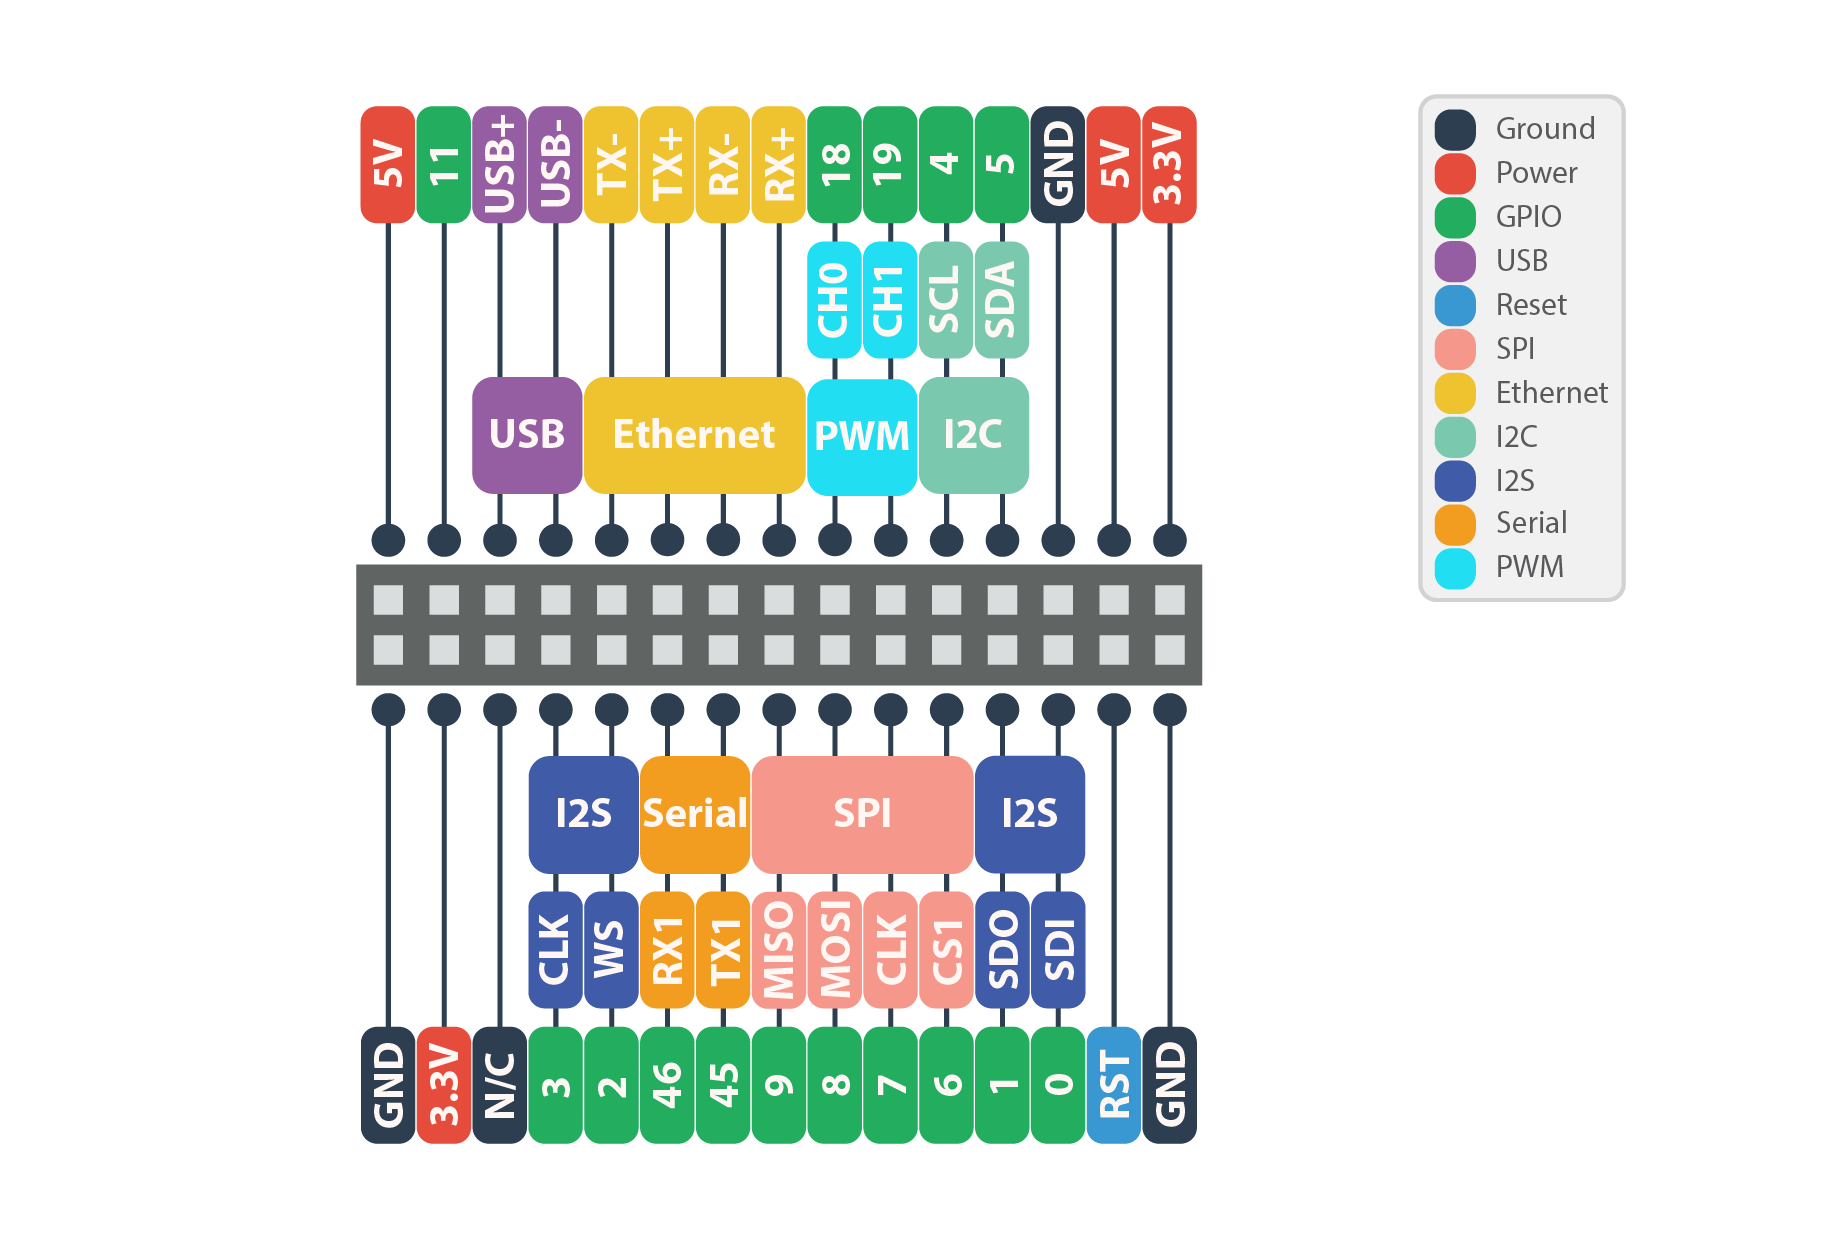
By default, the Serial, SPI, and I2C pins implement these communication protocols and cannot be used as GPIOs. Similarly, the I2S and PWM pins are set to GPIO mode by default.
To learn more on changing the functionality of the Omega’s pins, see the Multiplexing GPIOs section of our article on the Omega’s GPIOs.
LiPo Battery Support
An on-board battery management chip makes the Omega2 Pro compatible with LiPo batteries: they can be used as the main power source, and will be charged when the Omega is connected to USB power. Use a battery to make your project portable, or to act as a back-up power supply.
Learn more about the Omega2 Pro and batteries: https://onion.io/omega2-pro-get-started/#lipobatterysupport
Full-color Notification LED
Along with the system status and Wi-Fi status LEDs, there is a full-color LED (WS2812) driven by a hardware pulse width modulation (PWM) controller.
Learn more about controlling the full-color LED: https://onion.io/omega2-pro-get-started/#fullcolorled
Node-Red
Node-RED is a flow-based, visual programming tool that runs in the browser. It comes packaged as an OnionOS App on the Omega2 Pro and can be easily accessed through OnionOS in any browser.
Learn more about installing and using Node-Red on the Omega2 Pro by following this guide.
The Operating system
The Omega2 runs the OpenWRT Linux operating system, based on the OpenWRT 18.06 release. OpenWRT is excellent for embedded Linux and networking applications. Included with OpenWRT is the OPKG package manager, that allows easy download and installation of various packages to extend the functionality of your device.
The Amber Status LED
The Omega’s amber System Status LED provides a visual indication of the Omega’s current state,
| State | LED Activity |
|---|---|
| Not powered | Off |
| Booting/Updating | Blinking |
| Up and running | On |
The Omega LED uses GPIO44, and can be programmed to do a number of cool things. You can learn more about the LED in the article on how to use the Omega’s LED
The Blue WiFi Status LED
The blue WiFi status LED provides a visual indication of the device’s WiFi connection status to other networks:
| State | LED Activity |
|---|---|
| Not connected | Off |
| Connecting | Blinking |
| Connected | On |
The MicroUSB Port
The Micro-USB Port is used to supply power to the Dock, which in turn supplies power to the Omega.
The Micro-USB Port takes in 5V, and the Dock comes equipped with a voltage regulator to step the voltage down to 3.3V required for the Omega.
USB-to-Serial
The USB-to-Serial chip allows for a serial connection between the Omega and a computer using the USB-C port. You can connect a USB-C to USB cord from the Omega to your computer, open a terminal, and connect to the Omega via a COM port as opposed to SSH.
For more information on the Omega’s Serial connection read our guide to connecting to the Omega
Power Switch
The Power switch will cut power to the Omega, but not the serial chip. This means your computer will still detect a USB serial device, but will not be able to communicate with the Omega.
Omega USB Port
The Omega’s USB Port can be used to connect to all sorts of devices, namely a USB storage device to extend the storage space of your Omega. The USB port supports USB 2.0, and is a type A connector.
The WiFi Antenna
The on-board antenna is a ceramic surface-mount chip antenna. It’s small but packs a punch, the Omega’s WiFi signal is able to travel up to 100m (300ft) line-of-sight outdoors.
The U.FL Connector
Connect an external antenna to the Omega’s male surface-mounted U.FL connector. An external antenna can be used to extend the range of WiFi connectivity or provide a very directional signal. When an external antenna is plugged in, the SMT and external antennas will split the transmission power, providing only half of expected gain. In order to use your external antenna at its maximum performance, you will need to modify your Omega by removing the 0 Ohm resistor that is located between the WiFi antenna and U.FL connector so all the power goes to the external U.FL antenna.
Follow the procedure outlined here to modify your Omega.
DISCLAIMER: Perform any modifications to your device very carefully and at your own risk. This procedure is difficult to undo, and will require the permanent use of an external antenna to have any sort of reasonable WiFi connectivity. If you damage your Omega during this procedure, Onion Corporation is not responsible.
Software
See the omega2pro package in the OnionIoT/openwrt-packages GitHub repo for more details on the software package that’s specific to the Omega2 Pro.