Communicating with Serial Devices
A universal asynchronous receiver/transmitter (UART) is a device used for serial communication between two devices. The Omega comes with two UART devices: UART0, and UART1. UART0 is largely used for outputting the Omega’s command line, and UART1 is free to communicate with other devices.
This article will cover:
- what the UART does
- where it is on the hardware
- using the UART on the Omega
- via the command line
- via the
screencommand - using Python
Only two devices can communicate with each other per UART connection. This is different from other communication protocols, such as I2C or SPI, where there may be 3, 10, or many more devices connected to the same data lines.
What is a UART?
A UART is used for serial communication between devices. UART has no master-slave architecture and allows you to set the transmissions speeds of your data. The transmission speed is known as the baud rate, and it represents the time spent holding each bit high or low.
If you’ve connected to the Omega via serial before you’ll remember that we set the baud rate to 115200 bits-per-second, meaning that the time spent holding each bit high or low is 1/115200bps or 8.6µs per bit.
The UART on the Omega formats the data using the 8N1 configuration, in which there are 8 data bits, No parity bit, and one stop bit.

Connecting UART Devices
The UART uses the TX line to transmit data, and RX to receive data. When communicating with other devices, the TX on device A will send data to the RX on device B and vice versa.
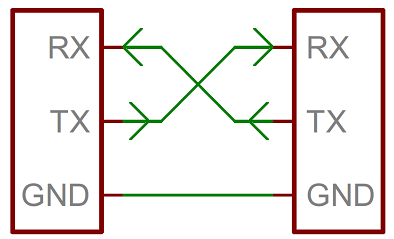
To set up a serial line connection between two devices:
- Connect device A’s
TXline to device B’sRXline. - Connect device A’s
RXline to device B’sTXline. - Connect the two devices’
GNDlines together.
The Omega & UART
UART interactions on the Omega2 are done using the virtual device files /dev/ttyS0 and /dev/ttyS1. This is made possible with sysfs, a pseudo-file system that holds information about the Omega’s hardware in files, and lets the user control the hardware by editing the files.
On the Hardware
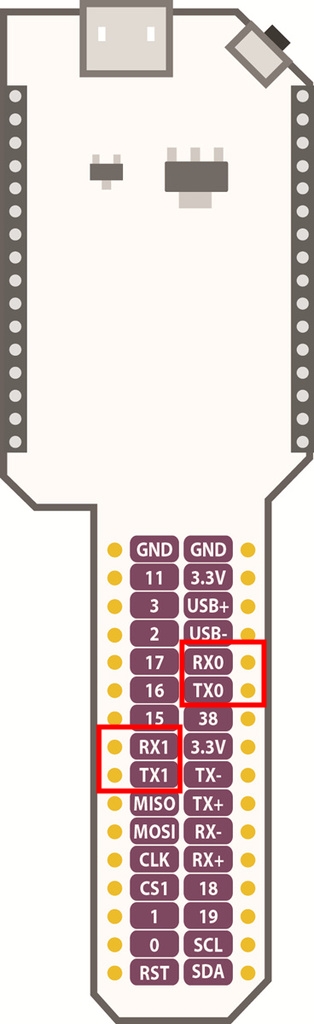
The UART pins are highlighted on the Omega2, Expansion Headers, and Breadboard Dock below.
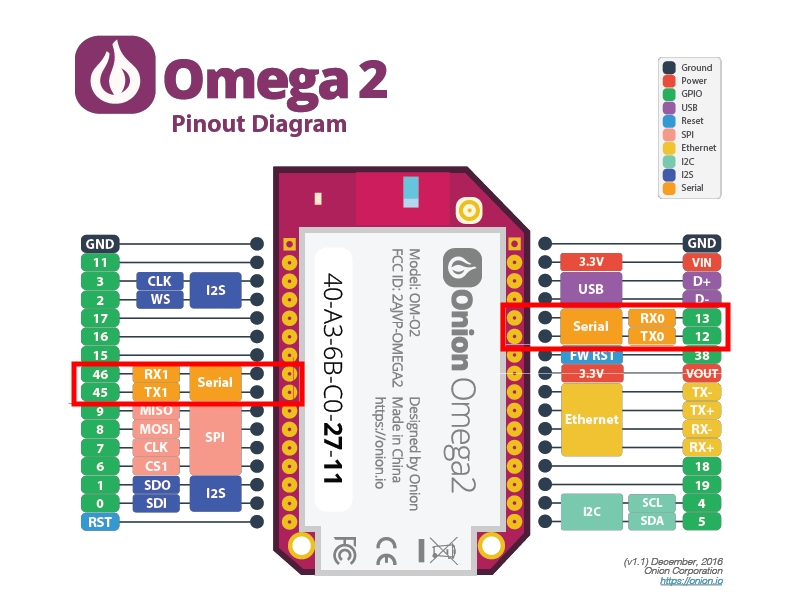
Pins 12 and 13 are used for UART0. These are primarily used for the command line on the Omega.
The UART1 uses pins 45 and 46. These are labelled as TX1 and RX1 to signify that they are used for UART1.
Expansion Dock & Power Dock
On the Expansion Dock and Power Dock, only UART1 is broken out, shown below:
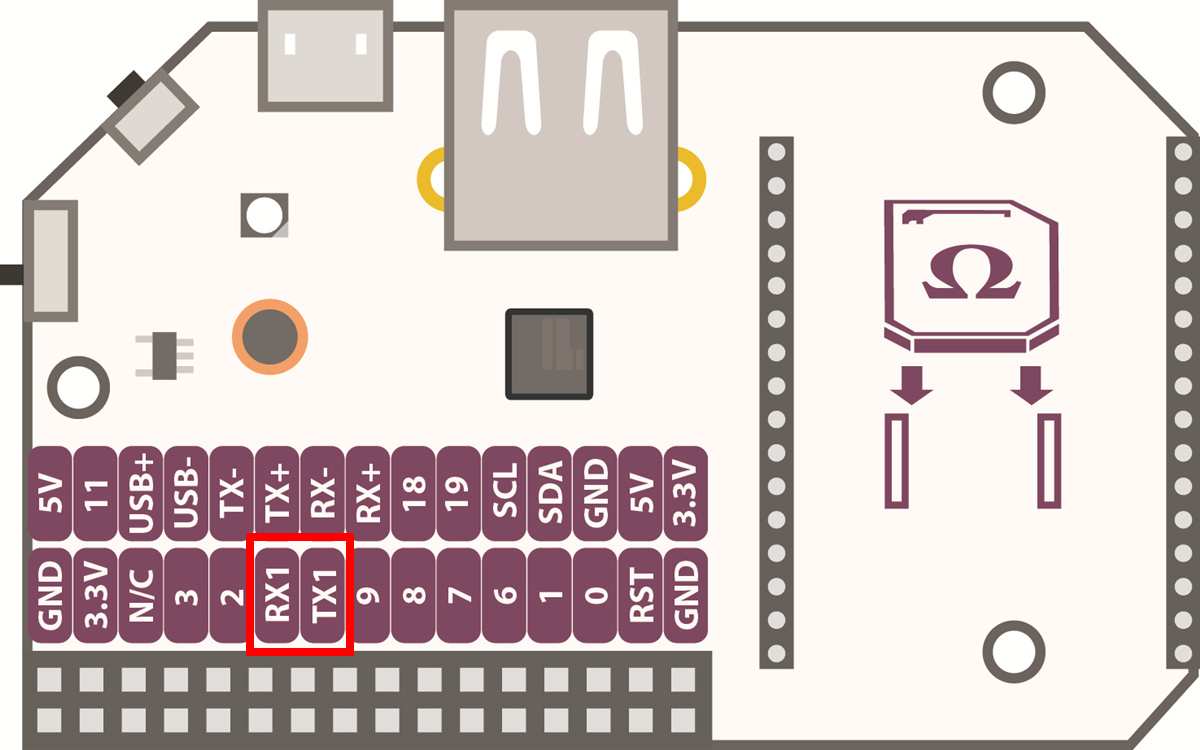
On the Expansion Dock, UART0 is connected to the on-board USB-to-Serial chip, providing direct access to the Omega’s command prompt with a USB connection.
Mini Dock
There are no GPIO headers on the Mini Dock so neither of the UARTs are available on the Mini Dock. However, just on like the Expansion Dock, UART0 is connected to the on-board USB-to-Serial chip, providing direct access to the Omega’s command prompt with a USB connection.
Arduino Dock2
Both UART0 and UART1 are available on the Arduino Dock 2:
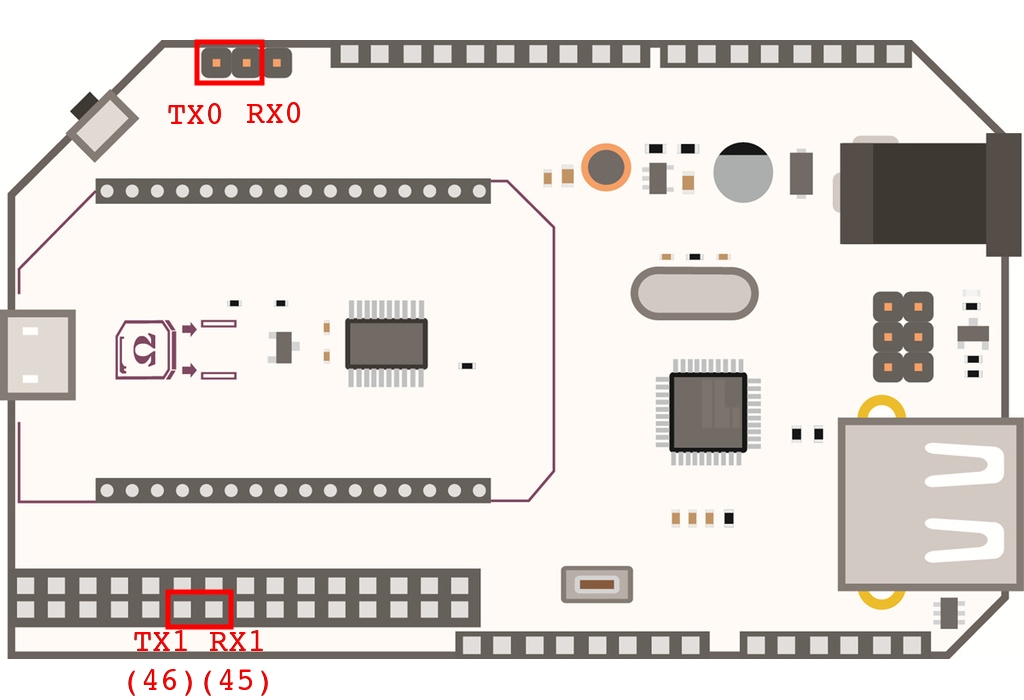
The Arduino Dock connects the on-board microcontroller’s serial port with UART1 on the Omega, allowing direct communication between the microcontroller and the Omega. This is useful since it offers users the freedom to fully define and design the communication between the two devices.
Breadboard Dock
Both UART0 and UART1 are available on the Breadboard Dock:
IMPORTANT: The TX+/- and RX+/- pins are used for the Ethernet Expansion. Be careful not to connect your serial lines to these pins!
Using the Command Line
We’ll be using some command line tools to write to (send) and read from (receive) data from /dev/ttyS1 just as if it were any other file.
Sending Data
To send data to UART1, simply echo to /dev/ttyS1 like so:
This command will not display any text on the screen when entered, as you are simply writing to a file.
Receiving Data
To read data from UART1, simply run cat on it like so:
This command will wait for and print any data received by the Omega until you exit the program (Ctrl-C).
Send and Print Received Data
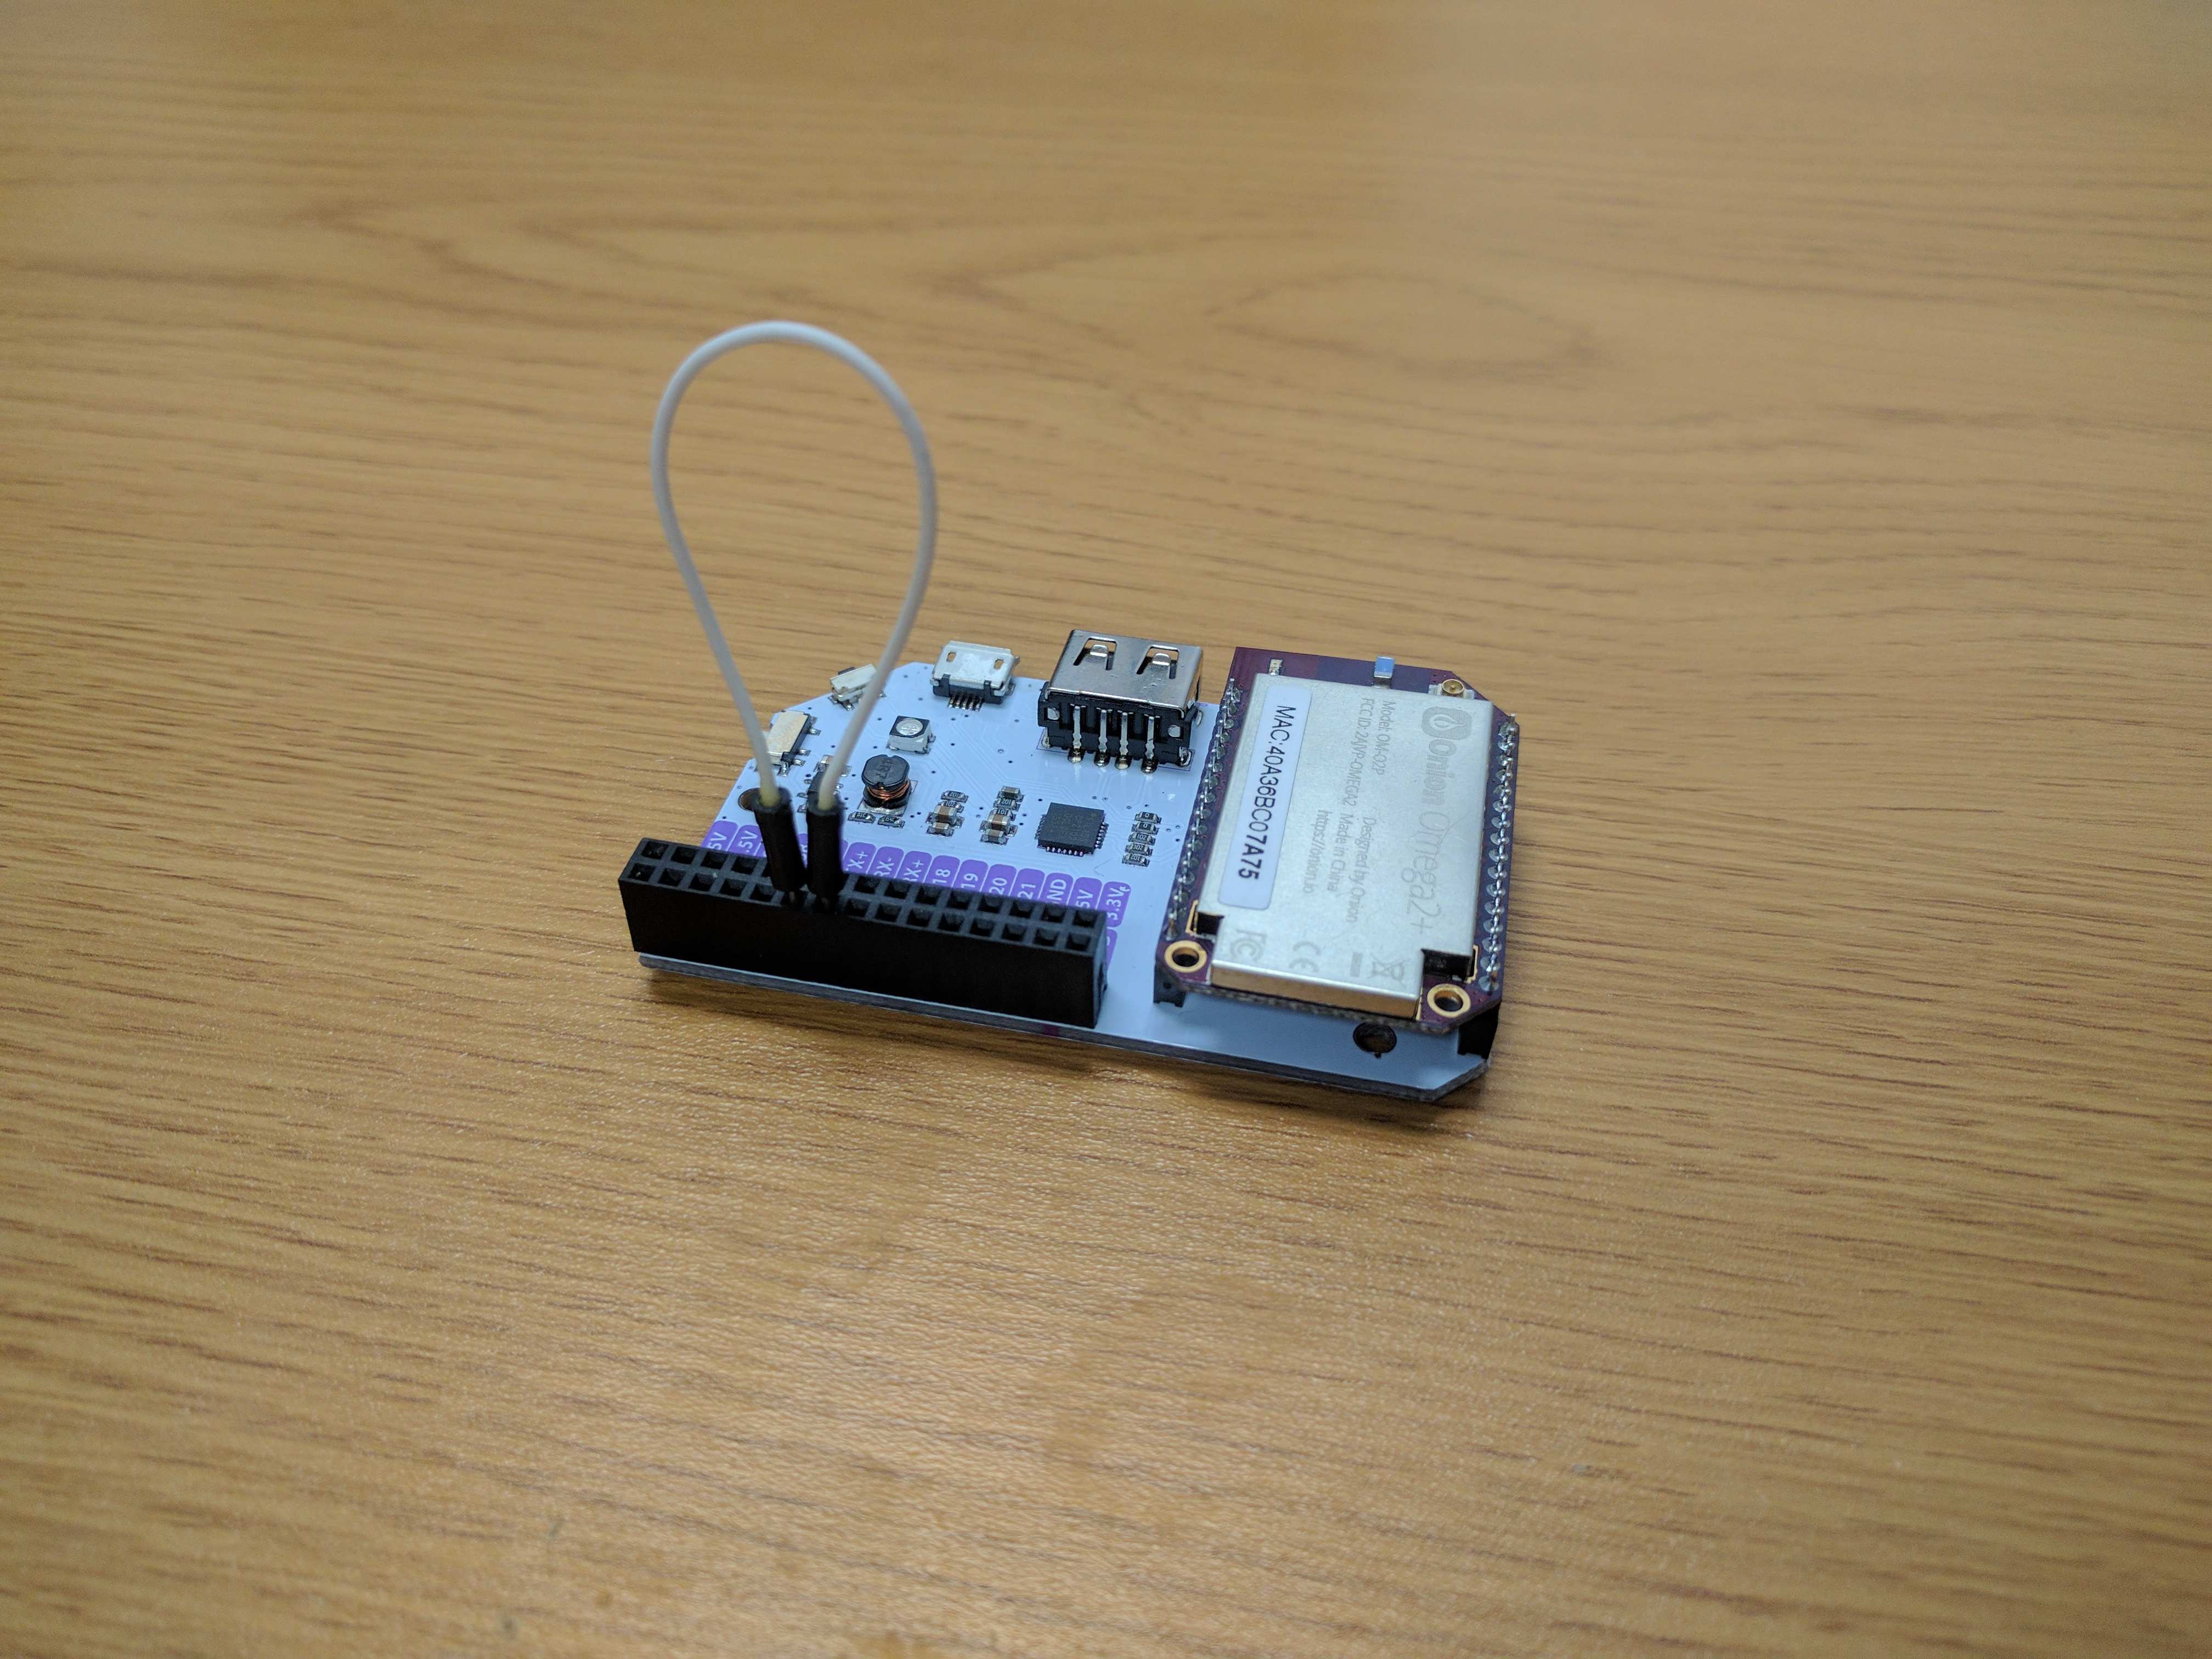
The above commands don’t do anything useful if you don’t have any serial devices connected. However, you can simulate real serial communication by having the Omega talk to itself!
Simply connect the Omegas’s RX and TX pins together as shown below; the GND connection is shared between the pins already.
Now open two separate command line sessions on your Omega. It’s easiest to connect via SSH in two separate terminals from your computer.
- In one terminal, run
cat /dev/ttyS1to start reading the serial port. - In the other, run
echo "hello world!" > /dev/ttyS1to write a message to the serial port.
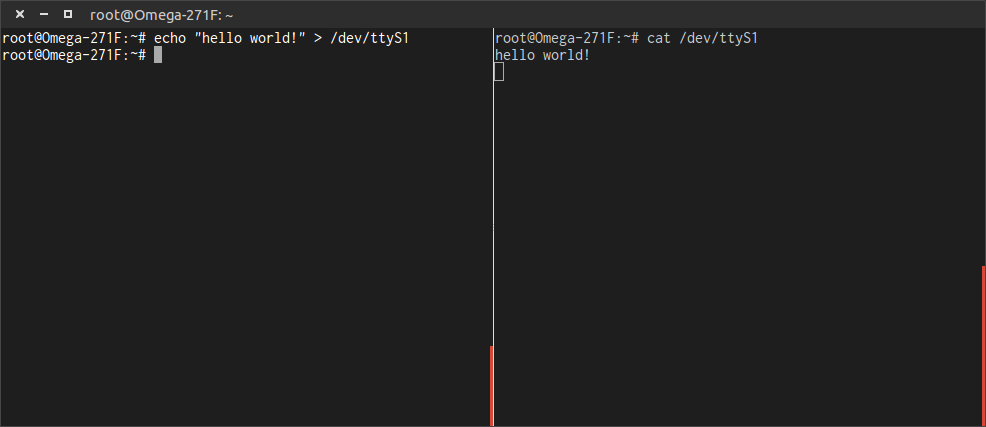
You will see your message appear in the terminal running cat. And that’s the basics of serial communication on the Omega!
Using the screen Command
The above method is a great way to introduce using UART, but it’s not all that practical. By using the screen command, we can actually send commands to other Omegas or connected devices.
Installing Screen
You’ll need to start by installing screen using the Omega’s package manager opkg. We’ll start by updating our list of packages:
opkg updateNow we’ll install screen:
opkg install screenAnd now you’re ready to use screen with the UART!
Running screen
To use the UART with screen enter the following command:
The terminal will go blank, and the command works the following way:
- Any keys or letters you type are immediately sent to the UART (ie. to the device connected to it)
- The terminal will immediately display any data received from the UART (ie. from the device connected to it)
To test this out using just 1 Omega, login to 2 separate SSH sessions as with the previous section. In both sessions, run the following example command:
Both terminals will now go blank, waiting for your input.
Now start typing hello world! in the first terminal, and the words will start to appear in the second!
This can be also done with 2 Omegas by connecting their TX1, RX1, and GND pins as described in Connecting UART Devices.
Working With screen Sessions
- To detach from the
screensession and leave it running so you can come back to it later, typeCtrl-athend.- For detailed information on how to work with attaching and reattaching, see the Screen User’s Manual.
- To kill (end) a session, type
Ctrl-athenk.
Detaching from a screen process does not end it, ie. it is still running. If you start and detach from several screen processes, these will begin to tie up your Omega’s memory.
To kill all screen processes, copy and paste the following command:
This big command essentially does the following:
- Get the list of running processes using
ps - Pipe (send) it to the
grepcommand and search for process names containing the wordscreengrepis a powerful utility to analyze text using regular expressions.
- Pipe those processes’ information to
awk, which outputs their process IDsawkis another powerful utility that can perform
killeach of the process IDs corresponding toscreen
Using Python
You can use Python and the PySerial module to communicate through serial ports, this includes UART1 and any USB-based serial devices. The method for installing PySerial depends on which Python version you’re using.
See our guide on installing and using Python on the Omega for more information on installing Python2.7 and Python3.6
Python2.7: Installing the PySerial Module
You’ll need to have python or python-light installed in order to continue. If you’ve installed the full version of Python you will already have PySerial.
You can read our guide to installing and using Python on the Omega for more information.
First update opkg:
opkg updateAnd then install python-pyserial:
opkg install python-pyserialYou’ll now be able to use PySerial!
Python3: Installing the PySerial Module
We’ll be using Pip to install the PySerial Module. For more details on Python3 and Pip, see our guide on installing and using Python on the Omega](#installing-and-using-python).
First, we’ll need to install the Python3 version of Pip:
opkg update
opkg install python3-pip
Then use Pip to install the PySerial module:
pip3 install pyserialAnd you’re all set to use PySerial in your Python3 programs.
Using PySerial
You can use PySerial by connecting a device to your Omega’s UART1. For more on the usage of PySerial you can read the PySerial documentation.