2025-05-13
Onion Omega2 Arduino Dock Starter Kit
Welcome to the Guide for the Onion Omega2 Arduino Dock Starter Kit!
![]()
What We’re Going to Learn
We’re going to learn about the following:
- How to put together circuits on a breadboard
- This is an essential skill for electronics prototyping!
- Get comfortable reading circuit diagrams
- Using the Omega’s command line interface
- How to flash the microcontroller on the Arduino Dock using the Arduino IDE
- Use Arduino sketches to control external circuits with the Omega and Arduino Dock
- Programming from the ground-up
- Learning If statements, For loops, While Loops
- Writing our own functions
- Using existing libraries
- Serial communication with the Omega
- Object Oriented programming
- Using classes
- Writing our own classes
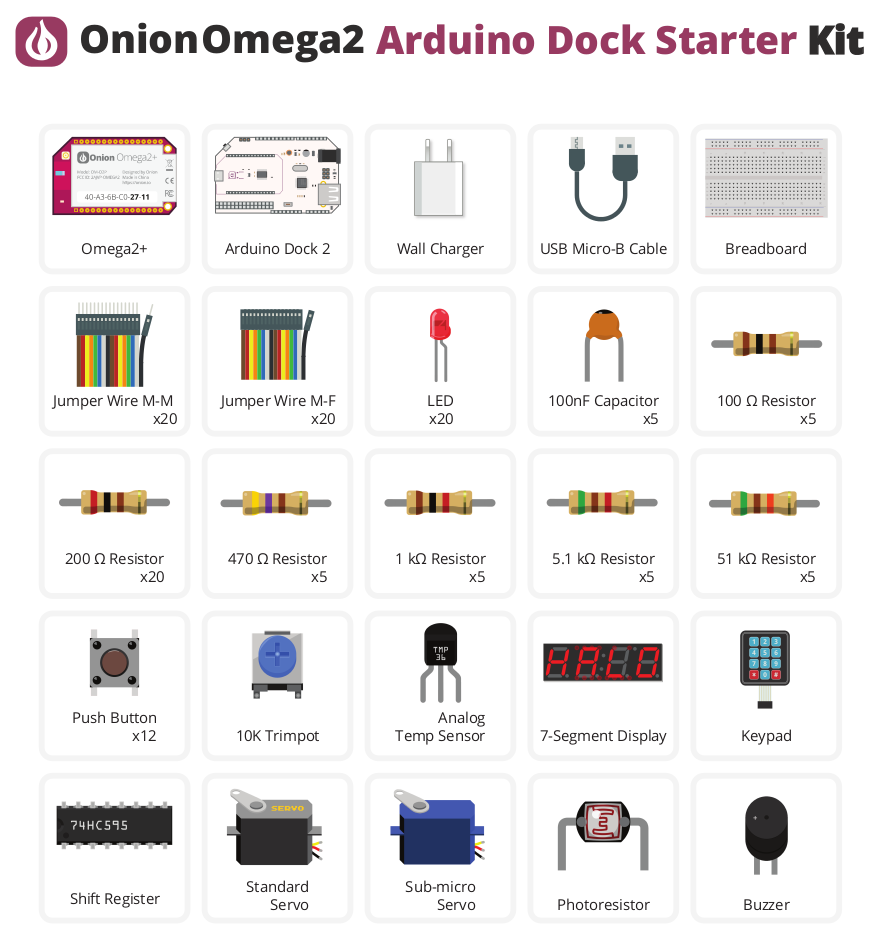
What’s Included
Your Arduino Dock Starter Kit contains the following items; we’ve labelled them here for your convenience.
How to Use This Guide
Before getting started on the experiments, set up your Omega by following the First Time Setup Guide.
Then you can learn more on:
We strongly recommend reading up on using the Arduino Dock:
- Setting up the Arduino IDE to wirelessly flash sketches to the Arduino Dock
- Resetting the Arduino Dock’s microcontroller
- Communication between the Omega and Arduino Dock ATmega microcontroller
Once you’ve done those, we recommend working your way through the experiments in order as they usually build on what we’ve learned in each one.
What Exactly Will I Learn?
Here’s a list of all of the experiments we’re going to build with your Kit:
- Blinking an LED
- Learn the basics of programming the Arduino Dock by turning an LED on and off.
- Blinking Multiple LEDs
- Learn some more programming concepts by controlling multiple LEDs at once.
- Reading a Potentiometer
- Read an analog input value from a potentiometer (knob) and use it to control your circuit.
- Reading a Button
- We’ll use a push button to control LEDs and learn about interrupts along the way.
- Sensing Ambient Temperature
- Use an analog temperature sensor to report ambient temperature to the Omega.
- Sensing Ambient Light Intensity
- Use a photoresistor and a voltage divider circuit to report ambient light intensity to the Omega.
- Using a Buzzer
- We’ll make our very own doorbell code and circuit.
- Controlling Servos
- Learn about object oriented programming and generating pulse width modulated signals to control servomotors
- Reading a Keypad
- Use a keypad to physically password protect a part of a program
- Using a Shift Register
- Learn how to use a shift register to effectively expand the number of GPIOs available to us and make a sweet effect with a bunch of LEDs
- Controlling a 7-Segment Display
- Send text from the Omega and display it on a 7-segment display!