Communicating with the Microcontroller
One of the method of communicating between the Omega and the microcontroller ATmega is through the serial interface UART1. The UART connection provides two-way communication using two pins on the Omega: TXD (transmitting from Omega) and RXD (receiving from ATmega).
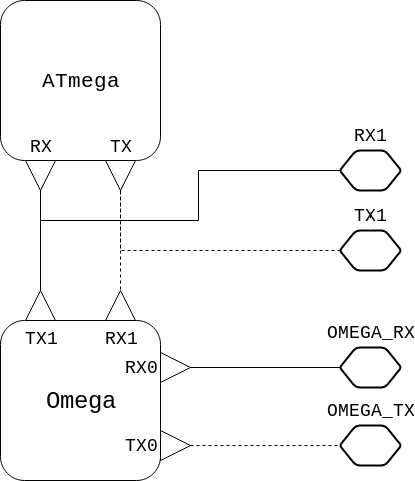
There are two UART ports on the Omega: UART0 and UART1. The port UART1 is used to connect the Omega to the ATmega on the Arduino Dock 2.
In order to communicate between Omega and the ATmega, we use command line or python script to send and receive data on the Omega. On the ATmega side, we flash the microcontroller with a sketch to read and write data.
One important thing to note is the baud rate, which is the rate at which the data is transferred in bits per second. The baud rate can be varied but the Omega and the ATmega UART must be programmed to have the same baud rate.
Flashing the ATmega to communicate with the Omega
First we need to flash the ATmega with a sketch that is programmed to communicate (read and/or write data) using serial communication on pins TX/RX .
We will use the Arduino serial library to send data back and forth. Here’s a very simple example sketch that will make the ATmega continously send out “ATmega”
void setup() {
  Serial.begin(9600);
}

void loop() {
  Serial.println("ATmega");
  delay(100);
}
Here is an example arduino program that will make the ATmega continuously read from the Omega. Only after it reads the string “ArduinoDock2”, it will send out the string “Received” to the Omega:
String readSerial;

void setup() {
  // start serial for output at baud rate 9600
  Serial.begin(9600);
}

void loop() {
  delay(100);
  // wait until there's serial data available
  if (Serial.available() > 0) {
    readSerial = Serial.readString();

    // check is the received data is "ArduinoDock2"
    if (readSerial == "ArduinoDock2") {
        Serial.print("Received");       // send the string "Received" to the Omega
        readSerial = "";
    }
  }
}
Using Omega2 Command Line
The most direct and easy way to send and receive data on the Omega side is to use the command line. UART interactions on the Omega2 are done using the virtual device files /dev/ttyS0 and /dev/ttyS1. This is made possible with sysfs, a pseudo-file system that holds information about the Omega’s hardware in files, and lets the user control the hardware by editing the files.
Sending Data
To send data to UART1, simply echo to /dev/ttyS1 like so:
This command will not display any text on the screen when entered, as you are simply writing to a file.
By default, the echo command will add a new line character to the end of the data, we can use the -ne option to avoid sending the new line if our microcontroller code doesn’t expect it:
echo -ne 'ArduinoDock2' > /dev/ttyS1Receiving Data
To read data from UART1, simply run cat on it like so:
This command will wait for and print any data received to the Omega until you exit the program (Ctrl-C).
Using the screen Command
The above method is a great way to get started with the UART, but it’s not all that practical if we need to send and receive data. By using the screen command, we can transmit and receive very easily.
Installing Screen
You’ll need to start by installing screen using the Omega’s package manager opkg. We’ll start by updating our list of packages:
opkg updateNow we’ll install screen:
opkg install screenAnd now you’re ready to use screen with the UART!
Running screen
To use the UART with screen enter the following command:
Where 9600 is the baud rate in bits per second (bps).
The terminal will go blank, and the command works the following way:
- Any keys or letters you type are immediately sent to the UART (ie. to the device connected to it)
- The terminal will immediately display any data received from the UART (ie. from the device connected to it)
Regarding Baud Rate:
We actually have the ability in our Arduino sketches to control the baud rate at which the serial communication will happen. The following line, usually found in the setup() function, initializes the serial communication at 9600bps:
Serial.begin(9600);Using the Omega as a Serial Monitor
A useful tool on the Arduino IDE is the Serial Monitor, which displays the output of any Serial.print() and Serial.println() statements in the code. We can use the Omega as the Serial Monitor by connecting the the Omega’s command line and running cat /dev/ttyS1 to observe the serial data.
You can alternatively run screen /dev/ttyS1 9600 to get an interactive (send and receive) Serial Monitor on the Omega.
If you need to do other things on the Omega, you can always open another SSH terminal session with the Omega, there’s no reason we can’t have multiple SSH sessions.
Going Further: Using Python through pySerial
A more flexible method for handling serial communication is by using a Python packaged called pySerial. However, this method will use more storage space.
Note that this is not used in any of our experiments, this is informational so you have an idea of where you can go next after completing all the experiments in the Kit. So you can safely skip this for now and come back to it later!
Installing the Module
Use opkg to install Python 2.7 and the pySerial module:
opkg update
opkg install python python-pyserial
For easy installation of pySerial we download pip (a package manager for python files) into the python directory:
curl https://bootstrap.pypa.io/get-pip.py | python2.7pySerial can be then installed through pip
pip install pyserialUsing PySerial
Now we can start programming in python to send and receive data on the Omega. For the full documentation check out this link:
https://media.readthedocs.org/pdf/pyserial/latest/pyserial.pdf
Here is some example Python code that will make the Omega continuously send “ArduinoDock2” until it reads the response “Received” from the microcontroller. In order for this to work correctl, your microcontroller will have to be flashed with the example Serial sketch we introduced above.
import serial

response = ""
while (response != "Received"):
        # Setup serial
        ser = serial.Serial(port='/dev/ttyS1', baudrate=9600, timeout=2)

        # Write string on UART1
        ser.write("ArduinoDock2")

        # Read 8 byte response
        response = ser.read(8)
        ser.cancel_read()
        print repr(response)

print "Received ArduinoDock2 from the microcontroller!"
To run the Python script on your Omega, make a python file using the vi editor and paste the above code inside:
vi serialTest.pyPress i to start entering text and paste the code from above. Hit the esc button and type :wq to save and close the file.
Then let’s run the script:
python serialTest.py