2025-05-13
Onion Omega2 Maker Kit
Welcome to the Guide for the Onion Omega2 Maker Kit!
![]()
What We’re Going to Learn
We’re going to learn about the following:
- How to put together circuits on a breadboard
- This is an essential skill for electronics prototyping!
- Get comfortable reading circuit diagrams
- Using the Omega’s command line interface
- Using the Omega PWM, Relay, and OLED Expansions
- Writing Python scripts on the command line
- Using Python to control external circuits with the Omega
- Programming from the ground-up
- Learning If statements, For loops, While Loops
- Writing our own functions
- Programming existing Python modules
- Controlling Omega Expansions using Python
- Object Oriented programming
- Using classes
- Writing our own classes
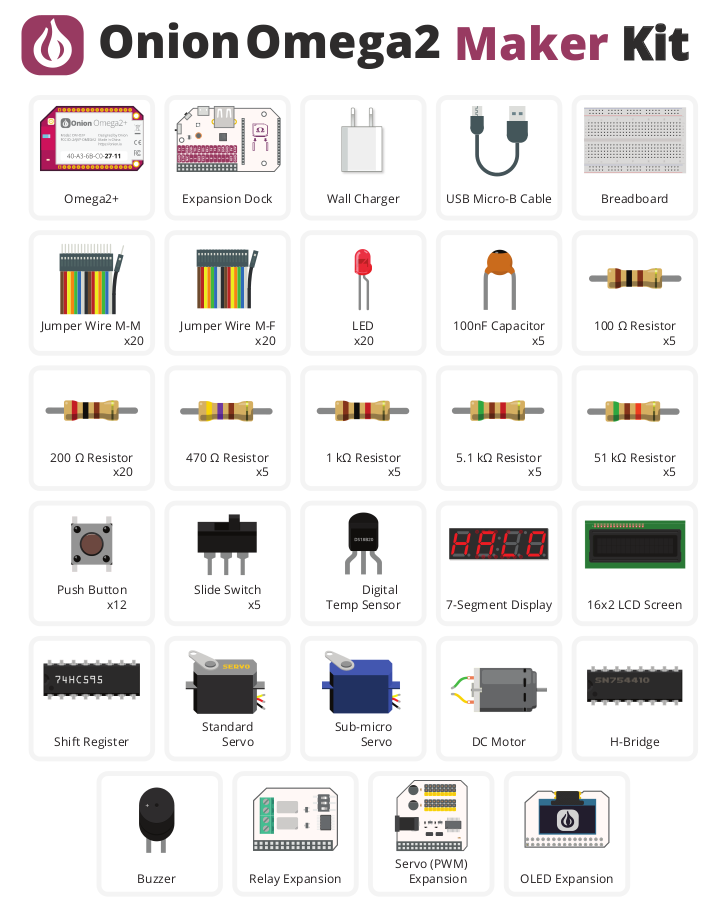
What’s Included
Your Maker Kit contains the following items; we’ve labelled them here for your convenience.
How to Use This Guide
Before getting started on the experiments, set up your Omega by following the First Time Setup Guide.
Then you can learn more on:
- Connecting to the Omega’s Command Line
- An introduction to using the command line
- Installing the software we need for the experiments
Once you’ve done those, we recommend working your way through the experiments in order as they usually build on what we’ve learned in each one.
What Exactly Will I Learn?
Here’s a list of all of the experiments we’re going to build with your Kit:
- Blinking an LED
- Learn the basics of programming the Omega by turning an LED on and off.
- Blinking Multiple LEDs
- Learn some more programming concepts by controlling multiple LEDs at once.
- Fading an LED
- Create a cool LED fading effect using the pulse width modulation technique.
- Reading a Switch
- Use a physical switch to control an LED through the Omega.
- Using a Shift Register
- Use a shift register chip to control 8 LEDs using only a few GPIOs.
- Controlling a Seven-Segment Display
- Add a seven-segment display to the previous circuit to display numbers.
- Reading a 1-Wire Temperature Sensor
- Use a 1-Wire temperature sensor to read the ambient temperature.
- Controlling LCD Screen
- Use the I2C protocol to control an LCD screen attached to the previous circuit.
And a list of tutorials on using the PWM, OLED, and Relay Expansions:
- Dimming LEDs
- Learn about Pulse Width Modulation and controlling LEDs
- Controlling Servos
- Use the PWM Expansion to control Servos and pick up some Python skills along the way
- Run a DC Motor with an H-Bridge
- We’ll get really creative and use the PWM Expansion to control an H-Bridge chip which will in turn drive a DC motor
- Writing text to the screen
- We’ll use Python to programmatically write text to the screen
- Changing the screen’s settings
- Learn how we can use user input to change display settings
- Draw lines!
- Prompt the user for input and use it to draw lines on the screen
- Controlling isolated circuits
- Learn how to control circuits electrically isolated from the Omega’s circuits