Reading a 1-Wire Temperature Sensor
Let’s now learn about and use the 1-Wire bus protocol to read the ambient temperature using a temperature sensor. To do that, we’ll first build a circuit using the 1-Wire temperature sensor. After it’s built, we’ll control this circuit with a script.
1-Wire Communication Protocol
The 1-Wire protocol is a bus-based protocol that uses, as the name implies, one data wire to transmit data between devices. It’s similar to the I2C protocol, but it has a longer range and a lower data rate.
It follows a master-slave architecture with each bus allowing for one master, in this case the Omega, and many slave devices. Every device type has its own unique single-byte (8 bit) identifier, eg. 0x8f. Each device in turn has its own unique 8-byte (64-bit) serial number that includes a byte to describe the device type, known as the family code, as the Least Significant Byte. An example of a serial number is shown below:

The protocol may also be found written as One Wire, One-Wire, or sometimes 1W. For consistency, we’ll be using 1-Wire in this and other guides. In code, we’ll use oneWire or OneWire because variable names cannot start with numbers in Python (and several other programming languages as well).
To make 1-Wire work with the Omega, we must first label a GPIO as a 1-Wire master bus. This will be the main contact point between the Omega and any 1-Wire devices. Once we have the master bus set up, we can then scan for the sensor through it and read from the sensor as needed.
The Omega does not have a dedicated hardware controller for this protocol, so we’ll have to send some low level instructions directly to the bus. This will be a good opportunity to learn about the process of reading and writing files.
DS18B20 Temperature Sensor
The DS18B20 sensor is a 1-Wire digital output sensor with high accuracy. The pin layouts can be found in the diagram below:
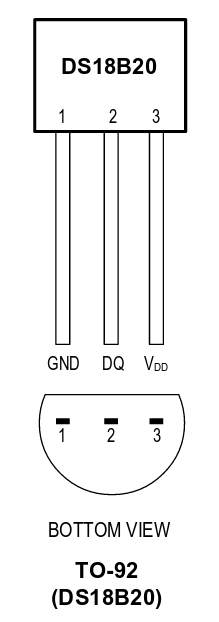
The Vdd and GND pins are for power and ground, and the DQ pin is the data line (both input and output).
You will typically need a pullup resistor (approximately 5.1kΩ at 3.3V) between the DQ and Vdd lines so that you can properly read the sensor’s output.
Note: We will treat the flat side as the front.
Building the Circuit
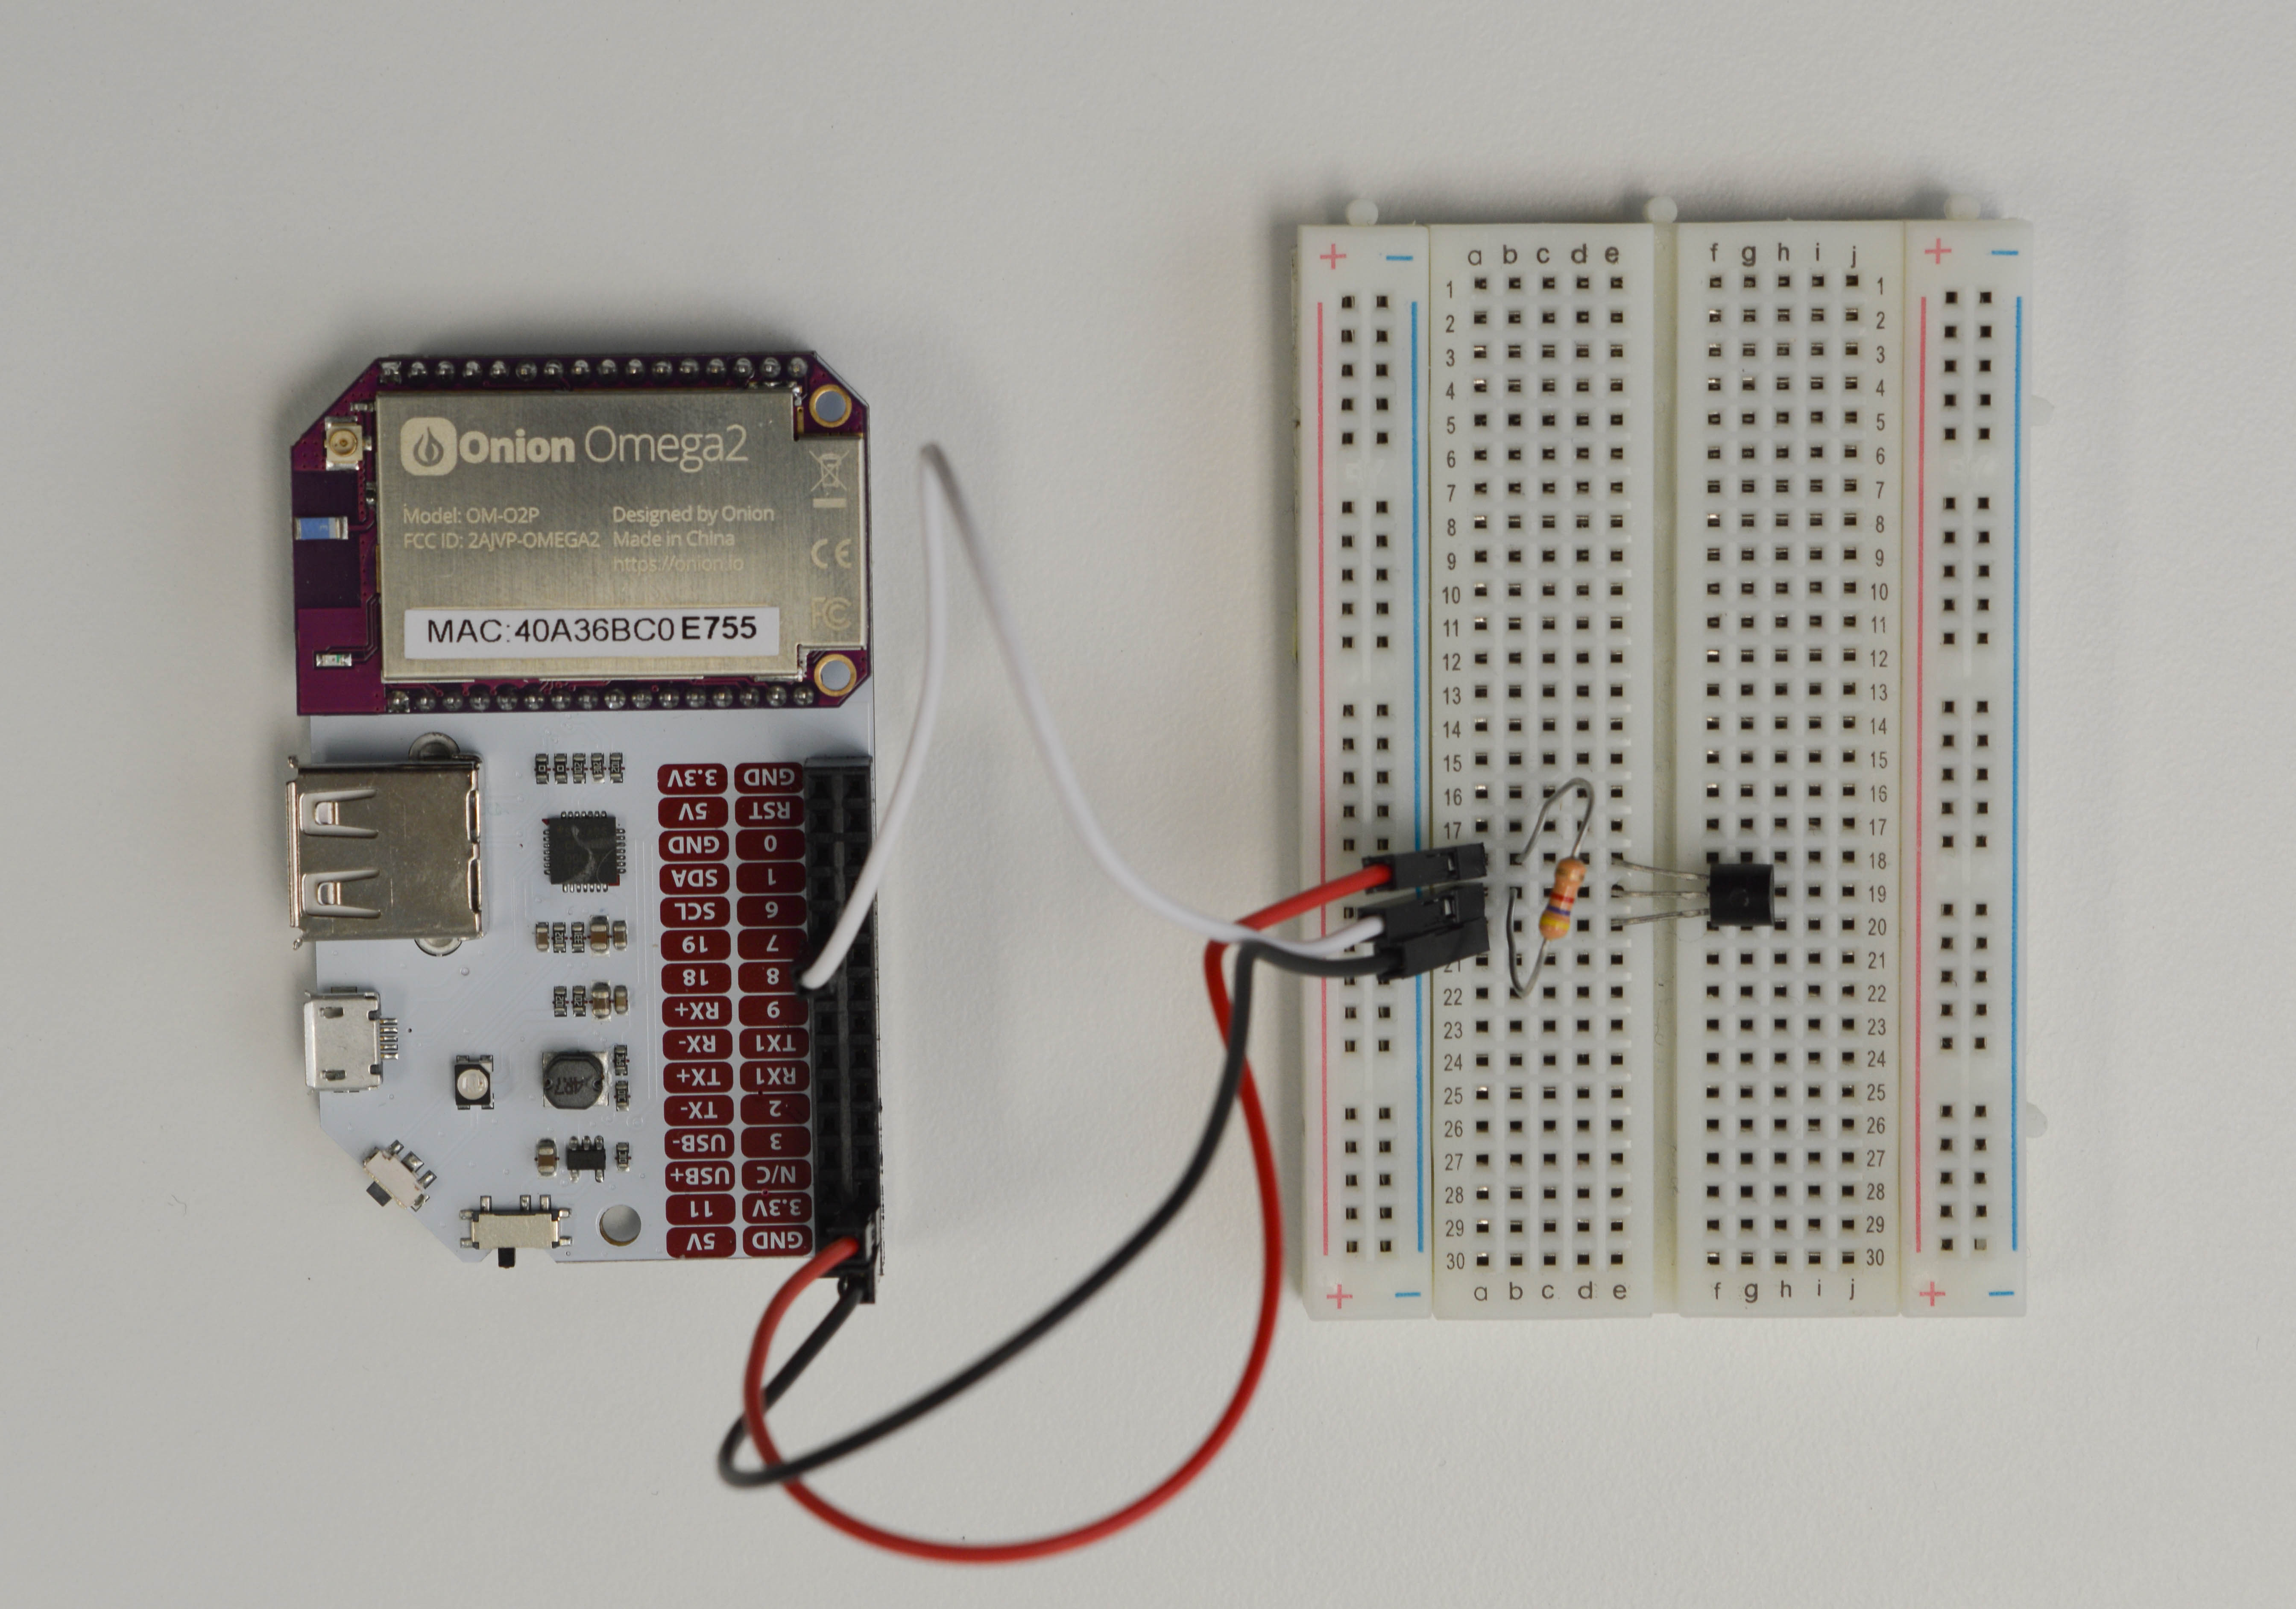
We’ll be building a circuit to connect the 1-Wire temperature sensor to the Omega. As the name implies, only one data line is needed for communication between any and all devices on the bus!
Here’s a diagram of the circuit we’ll be building:

What You’ll Need
Prepare the following components from your kit:
- Omega plugged into Expansion Dock
- Breadboard
- 3x Jumper wires (M-M)
- 1x 5.1kΩ Resistor
- 1-Wire temperature sensor
- Should read “Dallas 18B20” on the part
Hooking up the Components
- With the front of the sensor facing the middle gap of the breadboard, insert the three pins across 3 adjacent rows.
- Connect the 5.1kΩ resistor to both
DQ(pin 2) andVdd(pin 3). - Connect
GND(pin 1) to the Omega’sGNDpin. - Connect
DQ(pin 2) to the Omega’s GPIO19. - Connect
Vdd(pin 3) to the Omega’s3.3Vpin.
The reason we have this resistor is to make sure the max voltage of the
DQpin is equal to the voltage provided byVcc. If it isn’t properly referenced, aHIGHfrom theDATAline might appear to beLOW, making the data untrustworthy!
Your circuit should look like this:
GPIO19 was chosen rather arbitrarily. This will work with other GPIO pins as well. Just make sure to use a pin that is a GPIO by default (more details on that here). Be aware that you’ll need to modify the code below to specify your chosen.
Writing the Code
First, let’s create a base class for any generic 1-Wire device. This class will handle all the file reading and writing needed to interface with 1-Wire devices. Creating an object of this class will associate a GPIO pin with a 1-Wire bus, and the object will act as a clean interface between code and the low level 1-Wire functions. This is exactly how libraries are written!
Create a file called oneWire.py and paste the following code in it:
import os
import subprocess
import time

# specify delay duration to be used in the program
setupDelay = 3

# variables to hold filesystem paths
oneWireDir = "/sys/devices/w1_bus_master1"
paths = {
    "slaveCount": oneWireDir + "/w1_master_slave_count",
    "slaves": oneWireDir + "/w1_master_slaves"
}

## a bunch of functions to be used by the OneWire class
# insert the 1-Wire kernel module
# it's also called a "module", but it's actually software for the Omega's firmware!
def insertKernelModule(gpio):
    argBus = "bus0=0," + gpio + ",0"
    subprocess.call(["insmod", "w1-gpio-custom", argBus])

# check the filesystem to see if 1-Wire is properly setup
def checkFilesystem():
    return os.path.isdir(oneWireDir)

# function to setup the 1-Wire bus
def setupOneWire(gpio):
    # check and retry up to 2 times if the 1-Wire bus has not been set up
    for i in range (2):
        if checkFilesystem():
            return True # exits if the bus is setup
            # no else statement is needed after this return statement

        # tries to insert the module if it's not setup
        insertKernelModule(gpio)
        # wait for a bit, then check again
        time.sleep(setupDelay)
    else:
        # could not set up 1-Wire on the gpio
        return False

# check that the kernel is detecting slaves
def checkSlaves():
    with open(paths["slaveCount"]) as slaveCountFile:
        slaveCount = slaveCountFile.read().split("\n")[0]

    if slaveCount == "0":
        # slaves not detected by kernel
        return False
    return True

# check if a given address is registered on the bus
def checkRegistered(address):
    slaveList = scanAddresses()
    registered = False
    for line in slaveList:
        if address in line:
            registered = True
    return registered

# scan addresses of all connected 1-w devices
def scanAddresses():
    if not checkFilesystem():
        return False

    with open(paths["slaves"]) as slaveListFile:
        slaveList = slaveListFile.read().split("\n")
        # last element is an empty string due to the split
        del slaveList[-1]
    return slaveList

# use to get the address of a single connected device
def scanOneAddress():
    addresses = scanAddresses()
    return addresses[0]

# class definition for one wire devices
class OneWire:
    def __init__(self, address, gpio=19):      # use gpio 19 by default if not specified (change this if using a different GPIO)
        self.gpio = str(gpio)
        self.address = str(address)
        self.slaveFilePath = oneWireDir + "/" + self.address + "/" + "w1_slave"
        self.setupComplete = self.__prepare()

    # prepare the object
    def __prepare(self):
        # check if the system file exists
        # if not, set it up, then check one more time
        if not setupOneWire(self.gpio):
            print "Could not set up 1-Wire on GPIO " + self.gpio
            return False

        # check if the kernel is recognizing slaves
        if not checkSlaves():
            print "Kernel is not recognizing slaves."
            return False

        # check if this instance's device is properly registered
        if not checkRegistered(self.address):
            # device is not recognized by the kernel
            print "Device is not registered on the bus."
            return False

        # the device has been properly set up
        return True

    # function to read data from the sensor
    def readDevice(self):
        # read from the system file
        with open(self.slaveFilePath) as slave:
            message = slave.read().split("\n")
            # return an array of each line printed to the terminal
        return message
Let’s create a file called temperatureSensor.py to hold some more code. This file will implement a TemperatureSensor class. Objects of this class will represent a single DS18B20 sensor in code. Like in our previous experiments, we’ll instantiate a OneWire object inside the TemperatureSensor class. The class functions will then send it the signals that we want and retrieve response data from the sensor without us having to worry about the underlying 1-Wire functions. This way we can focus on the logic of what to do with the data.
from oneWire import OneWire

# main class definition
class TemperatureSensor:
    def __init__(self, interface, args):
        self.supportedInterfaces = ["oneWire"]
        self.interface = interface
        self.ready = False

        # if specified interface not supported
        if self.interface not in self.supportedInterfaces:
            print "Unsupported interface."
            self.listInterfaces()
            return

        # set up a driver based on the interface type
        # you can extend this class by adding more drivers! (eg. serial, I2C, etc)
        if self.interface == "oneWire":
            self.driver = OneWire(args.get("address"), args.get("gpio", None))
            # signal ready status
            self.ready = self.driver.setupComplete
            # match the return value to
            self.readValue = self.__readOneWire;

    def listInterfaces(self):
        print "The supported interfaces are:"
        for interface in self.supportedInterfaces:
            print interface

    # read one-wire devices
    def __readOneWire(self):
        # device typically prints 2 lines, the 2nd line has the temperature sensor at the end
        # eg. a6 01 4b 46 7f ff 0c 10 5c t=26375
        rawValue = self.driver.readDevice()

        # grab the 2nd line, then read the last entry in the line, then get everything after the "=" sign
        value = rawValue[1].split()[-1].split("=")[1]

        # convert value from string to number
        value = int(value)

        # DS18B20 outputs in 1/1000ths of a degree C, so convert to standard units
        value /= 1000.0
        return value

    # add more __read() functions for different interface types later!
Now let’s write the script for the main routine. Create a file called STK08-temp-sensor.py and paste the following in it. This script will use the two classes we’ve created to continuously check the sensor and display the data to the console. Through abstracting out the details into two other classes, this script can be short and sweet.
# import modules and classes
import time
from temperatureSensor import TemperatureSensor
import oneWire

# setup onewire and polling interval
oneWireGpio = 19 # set the sensor GPIO
pollingInterval = 1 # seconds

def __main__():
    # check if 1-Wire is setup in the kernel
    if not oneWire.setupOneWire(str(oneWireGpio)):
        print "Kernel module could not be inserted. Please reboot and try again."
        return -1

    # get the address of the temperature sensor
    #   it should be the only device connected in this experiment
    sensorAddress = oneWire.scanOneAddress()

    # instantiate the temperature sensor object
    sensor = TemperatureSensor("oneWire", { "address": sensorAddress, "gpio": oneWireGpio })
    if not sensor.ready:
        print "Sensor was not set up correctly. Please make sure that your sensor is firmly connected to the GPIO specified above and try again."
        return -1

    # infinite loop - runs main program code continuously
    while 1:
        # check and print the temperature
        value = sensor.readValue()
        print "T = " + str(value) + " C"
        time.sleep(pollingInterval)

if __name__ == '__main__':
    __main__()
If you just did the Seven Segment experiment, you may need to free up your GPIOs in the filesystem. Run the unexport commands outlined in the previous experiment before continuing.
Now run the STK08-temp-sensor.py script and watch the terminal for output.
What to Expect
You should see the Omega printing the temperature in degrees Celsius measured by the sensor once every second. Try pinching the sensor with your fingers and seeing what happens!
Your output should look something like this:
root@Omega-F119:~# python STK08-temp-sensor.py
T = 25.187 C
T = 25.187 C
T = 25.187 C
T = 25.562 C        # pinching the sensor here!
T = 27.25 C
T = 28.75 C
T = 29.562 C
T = 30.187 C
T = 30.562 C
T = 30.812 C
T = 31.062 C
T = 31.187 C
T = 31.375 C
T = 31.937 C
T = 32.312 C
T = 32.562 C
T = 32.625 C        # Ctrl-C
A Closer Look at the Code
Here we control a 1-Wire device through the Omega’s filesystem by reading and writing files. We also introduce the concept of scanning a bus for devices and device addresses. We’ll also explain the __name__ == '__main__' concept - what it does, and when should you use it.
Hardware and the Omega’s Filesystem
The Omega’s hardware such as the serial ports, I2C, and SPI bus are exposed as files somewhere in the system (in fact, this is true for most Linux systems). In order for software and programs to interact with these connections, they must work with the corresponding files by reading and writing. This is a very important concept, so please make sure to remember it!
Working with Files
When working with a file from within a program, you must go through the following steps:
- Open the file for reading, writing, or both at the same time
- Read from or write to the file
- Close it when you’re done
This applies to all programs that interact with the filesystem, not just Python.
What about Hardware?
Hardware connected to the Omega’s ports are represented by ‘virtual’ files in the system, usually listed under /sys/devices. The process to interact with them directly is to read and write to those files!
Putting it Together
Our 1-Wire connection is first initialized as a file through this line in oneWire.py:
This calls a system command (insmod) to set a specific GPIO to act as a 1-Wire master bus. The command sets up the specified GPIO as a virtual file that we can then read and write to as a 1-Wire interface - /sys/devices/w1_bus_master1.
To work with the 1-Wire file, we take advantage of Python’s with statement. This allows us to cleanly open the file and automatically close it when we’re done! Here’s an example of all of this happening in the oneWire.py file:
This simple 2-line block reads from the slave’s system file at /sys/devices/w1_bus_master1/<address>/w1_slave", which triggers the Omega to physically send a request to the 1-Wire sensor and return the data to our program. The file is then automatically closed once the program exits that block. Here, the slave object is a Python File Object and we read it just as we would a regular file!
Scanning a Bus
You may have noticed that the the OneWire class is used by the TemperatureSensor class and should not need to be imported explicitly. However, for the purposes of this experiment, we included it in the main script to use its scanOneAddress() function.
This is because every 1-Wire sensor has its own unique address. To work with a sensor from within a program, you would have to manually find the address and write it in your code as a variable. To make this process faster:
- We make sure that the sensor is the only 1-Wire device connected to the bus.
- We then query the bus for device addresses.
- The only one that will appear is the one that corresponds to our sensor.
This is all done automatically to save you time.
If you want to find the address of a 1-Wire device to write it down for later, follow these steps:
- Disconnect all other 1-Wire devices from the Omega, then connect your device.
cdto the folder containingoneWire.pyand start the Python interpreter withPython.- Run these commands:
The device’s address will then be printed on the screen.
Python Modules and the __main__ Function
Any Python code file can be both executed directly, or imported as a module. When a module is imported, all of the code contained within it is executed and any functions or classes are made available to the program that imports it. But what if your module had functions that you want to run by executing the module directly, but not when it’s imported?
Enter the __name__ variable!
Loosely speaking, every file in Python has a hidden __name__ variable. When the file is imported, the value of __name__ is set to the name of the module. For example if your file is called file.py, __name__ will be 'file'. However if the file is run by calling python file.py, Python will set the __name__ variable to '__main__'.
Using this behaviour we can make sure importing a module is silent, while any code we want executed when we run the file will still be executed. We do this by placing whatever code we wish to execute by running the file in a function, and checking the __name__ variable to decide whether to call that function or not.
You can see this happening in two places in our code. First we define the __main__() function, and put all the code we would like to be run inside it:
After that, we check the __name__ variable to run the code only when it’s executed:
That’s it! Now STK08-tempSensor.py can be imported as a module without running its code immediately on import. You can apply this technique to extend scripts that you’ve previously written and reuse them in later files.