Communicating with I2C Devices
I2C (Inter-Integrated Circuit), sometimes called Two-Wire Interface, is a serial interface used to quickly and easily connect multiple devices to controllers and processors such as the Omega2. Examples of I2C devices include:
- Sensors, such as temperature, humidity, current
- Actuators, such as buzzers, lights
- Controllers, such as motors, relays
Communication is performed over 2 data lanes, each given their own pin on the Omega2:
- Clock (SCL) - Signals when data is being transferred
- Data (SDA) - Carries the data to be transferred
The I2C bus uses a master-slave architecture, which means the following:
- Bus masters are devices that are in control of when and to whom they send and receive data.
- Masters send commands which include the address of the slave who should receive it.
- When using I2C with the Omega2, the Omega2 is configured to be the only bus master.
- Bus slaves are devices that respond to masters when they receive a command addressed to them.
- Each slave is identified with a hexadecimal address (eg.
0x27). - Slaves will safely ignore commands not addressed to them.
- Each slave is identified with a hexadecimal address (eg.
- Masters and slaves operate in either of two modes:
- transmit - sending data
- receive - receiving data
If you’re interested in the full details, see the Wikipedia article on I2C for more.
The Omega & I2C
All I2C interactions on the Omega2 are done using the virtual device file /dev/i2c-0. This is made possible with sysfs, a pseudo-file system that holds information about the Omega’s hardware in files, and lets the user control the hardware by editing the files.
On the Hardware
The I2C pins (SCL and SDA) on the Omega2 and Expansion Dock are highlighted below.
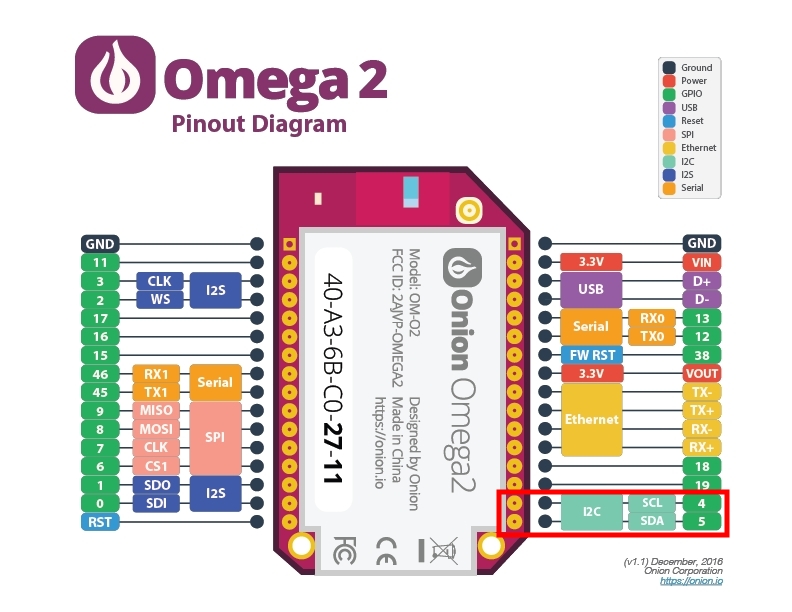
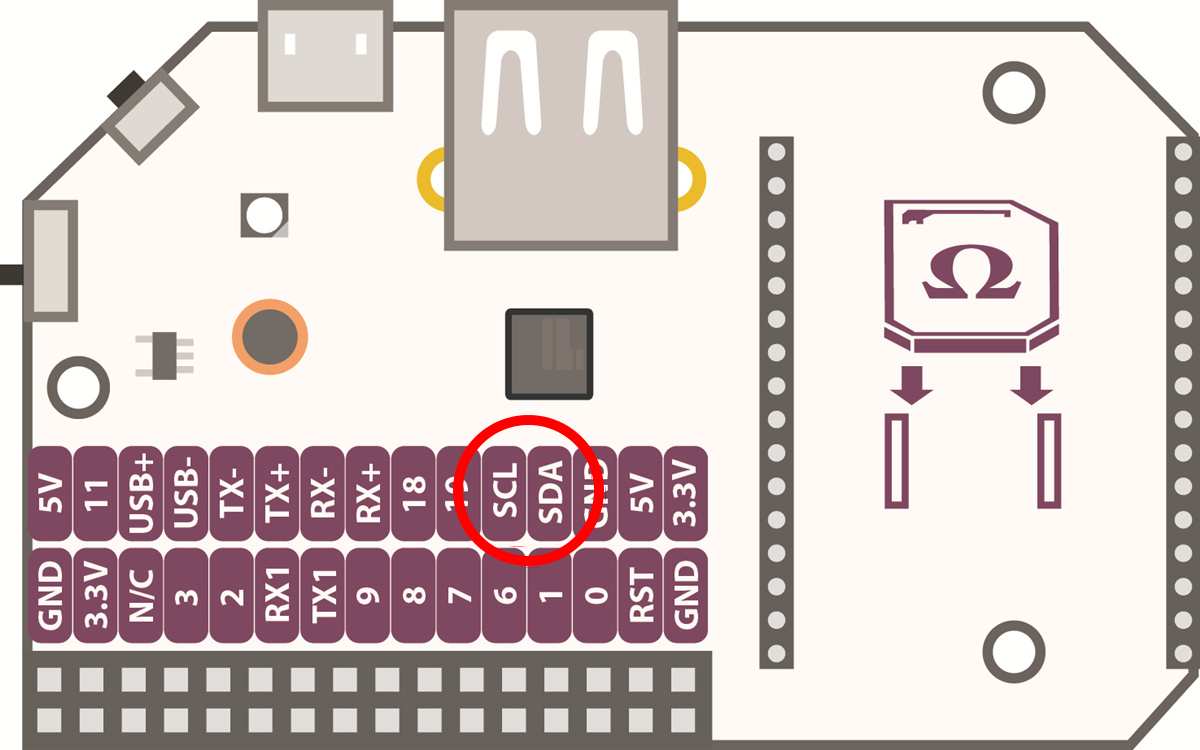
Note: On some older Expansion Dock units, SCL is labelled as pin 20, and SDA is labelled as pin 21.
Controlling I2C Devices from the Command line
We’ll be using three command line utilities, i2cdetect, i2cget and i2cset, to work with I2C devices. These tools work by using the Omega’s I2C bus to communicate with any connected I2C devices.
Detecting Slave Devices
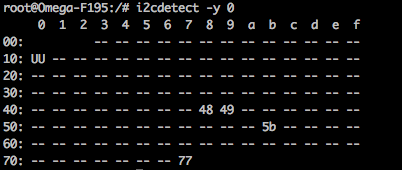
The i2cdetect command is used to find the addresses of every device connected to your Omega’s I2C bus. The command is used as follows:
It will then output a table outlining the device addresses of each slave device connected to the bus:
Your Omega will need to be on firmware
v0.2.2 b194or later to support thei2cdetectcommand.
Interacting with I2C devices
We’ll be using the i2cget and i2cset utilities to read data from and write data to I2C devices. These tools work by using the Omega’s I2C bus to access data stored in registers on the device. A register is a location in a device’s memory. When reading from/writing to an I2C device, you need to specify the register on the device that you want to access.
Reading a Byte
The i2cget command is used to read a value of a specific register on an I2C device. A typical command reads as follows:
The options are explained below:
-y- skip the prompt for confirmation from thei2cgetcommand0- the I2C bus to use. The Omega2 has one I2C bus, denoted as bus0.<DEVICE ADDRESS>- the address of the slave device, eg.0x40<REGISTER>- the register on the slave to read from, eg.0x00
For example, let’s say we have an I2C temperature sensor at address 0x40 acting as a slave with the following registers:
0x00- stores temperature in degrees Fahrenheit0x01- stores temperature in degrees Celsius
Let’s say we’re interested in reading the temperature in degrees Fahrenheit. We do this using the following command:
And it returns 0x48, which is 72 in decimal (22 degrees Celsius). That’s some nice weather outside!
Writing a Byte
i2cset is used to set the value of a register on a target I2C device. A typical command looks like this:
The options are explained below:
-y- skip the prompt for confirmation from thei2cgetcommand0- the I2C bus to use. The Omega2 has one I2C bus, denoted as bus0.<DEVICE ADDRESS>- the address of the slave device, eg.0x27<REGISTER>- the register on the slave to write to, eg.0x00<VALUE>- the value to write, eg.0x33
Let’s say we have an I2C room light controller at address 0x27 acting as a slave with the following registers:
0x00- living room,0for OFF,1for ON0x01- dining room0x02- bedroom
For example, to turn the living room lights ON and the dining room lights OFF, we would run these commands:
The Omega Expansions
Some of our Expansions use I2C to communicate with the Omega. To learn more about how to work with them, take a look at the guides below:
More Resources
Moving Beyond the Command line
I2C using Python
We’ve developed an I2C Python module that you can import into your apps. For all the details, see the I2C Python Module.
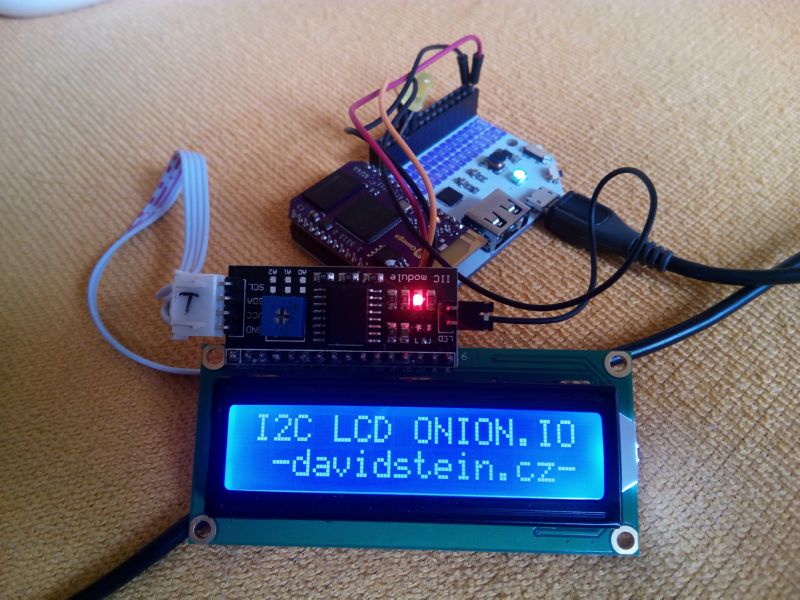
Example - Controlling an I2C LCD Display
This tutorial is brought to you by Matthew Ogborne and David Stein. Thanks guys!
First find or buy an I2C LCD display. They can be found online on Amazon or Ebay.
Install the following packages on your Omega2:
Next, download David’s library for the LCD display:
Wire up your LCD display as shown below:
| Omega Expansion Pin | LCD Display Pin |
|---|---|
| 5V | 5V |
| GND | GND |
| 20 | SCL |
| 21 | SDA |
If you’re thinking, “hold on, this display is 5V and the Omega is 3.3V, how will this work?”, you have a good eye! What’s happening here is that we’re using the 5V available on the Dock to power the display, and then using the Omega’s 3.3V I2C signals to control the display. This is safe for the Omega since there will be no 5V input coming to the GPIOs as long as we don’t try to perform an I2C Read operation - which is expected since most screens don’t support reading register values. The LCD is able to read the commands from the Omega since the 3.3V logical high is greater than the logical high threshold voltage on most TTL circuits used in displays.
Navigate to the src directory:
To use library you can use command line parameters:
Input
Output
Usage: lcd.py [options]

Options:
-h, --help show this help message and exit
-a ADDRESS, --address=ADDRESS
I2C Adress
-p, --persistent -p = do not clear display before new write
--line1=LINE1 text to line 1
--line2=LINE2 text to line 2
--line3=LINE3 text to line 3
--line4=LINE4 text to line 4
--backlight-off Turn off backlight
Example
Now you should see sample text on your LCD. You can edit lcd.py to change the displayed text. You can also import the whole library into your own Python project!
For more details, see David’s blog post.
I2C using C & C++
We have also developed an I2C library for C and C++. For all the details, see the I2C C Library